Picture this:
You’re scrolling through your Facebook feed. A well-crafted post catches your eye.
The headline is enticing, the description pulls you in, and the image is the cherry on top.
You like, share, or click on it, right?
This is the power of Open Graph in action—and this article will teach you how to use it for yourself.
Understanding Open Graph Tags
Open Graph is a protocol by Facebook that enables your webpages to become a rich object in a social graph. In simpler terms, Open Graph controls how your website’s content appears when shared on social media.
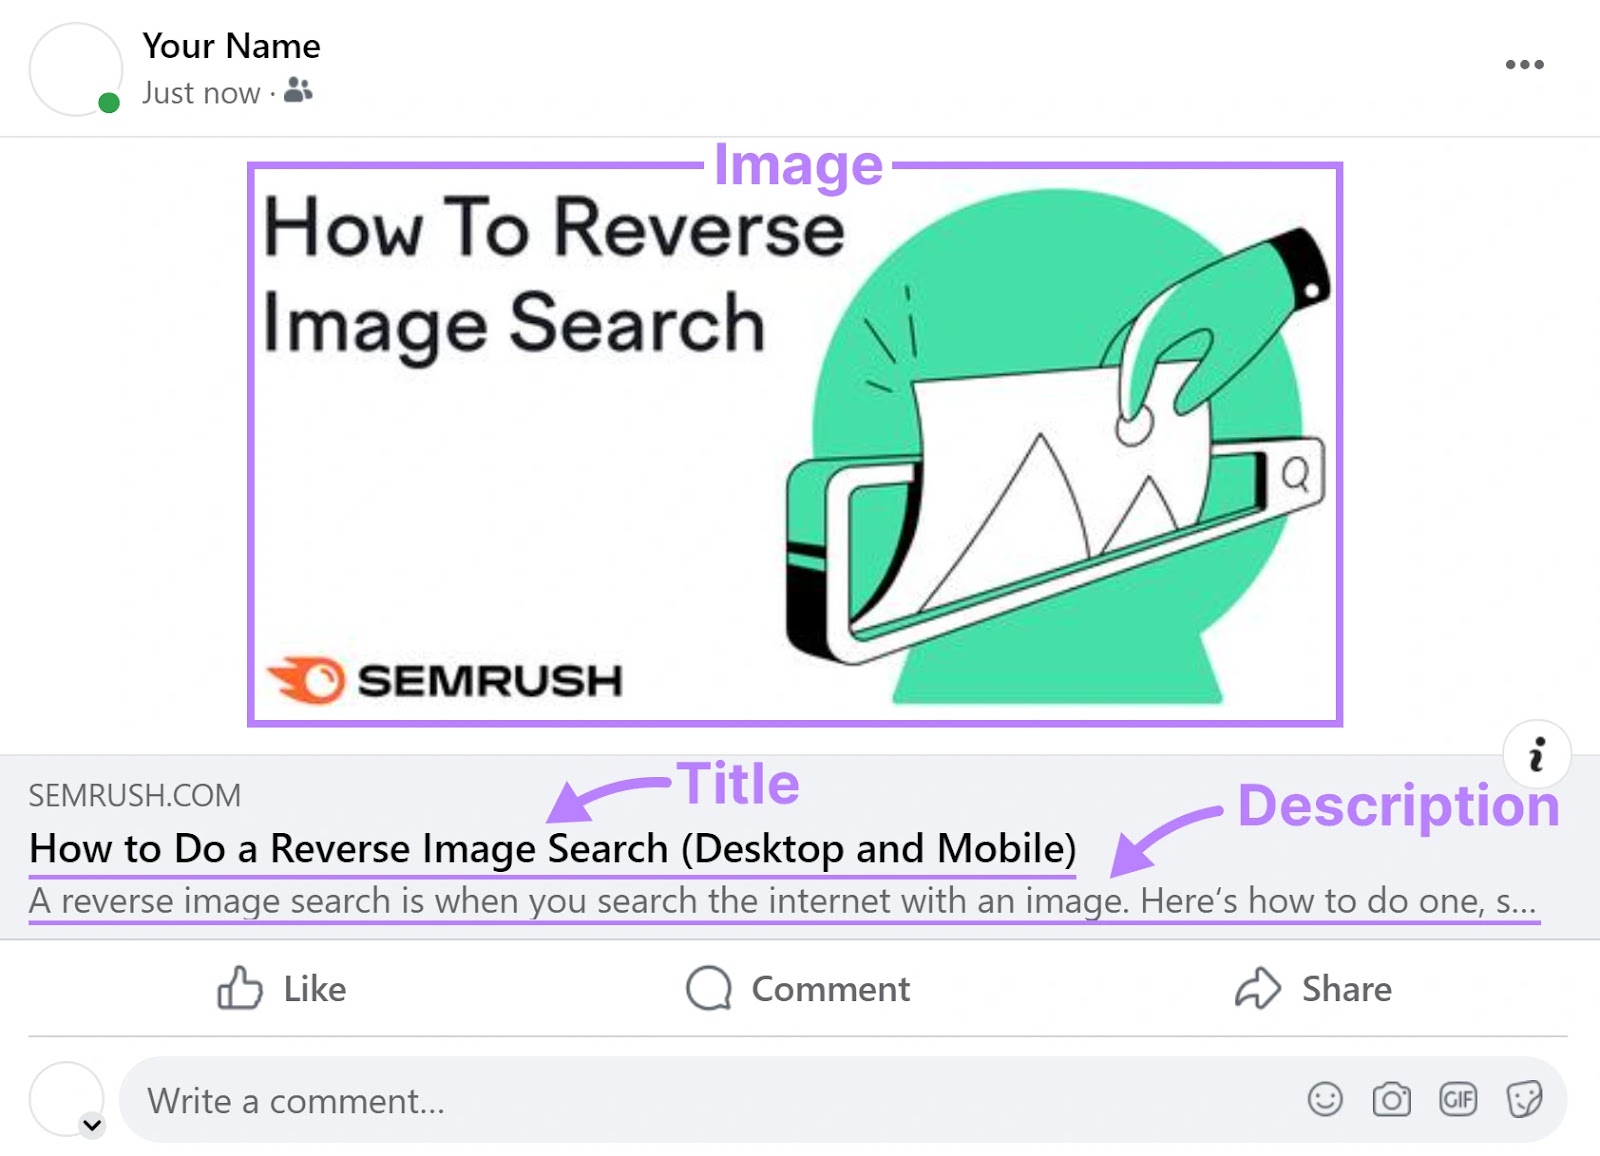
How does Open Graph do this?
The secret lies in the Open Graph tags you embed in your webpages. These tags dictate what title, description, and image social media platforms should use when your content is shared.
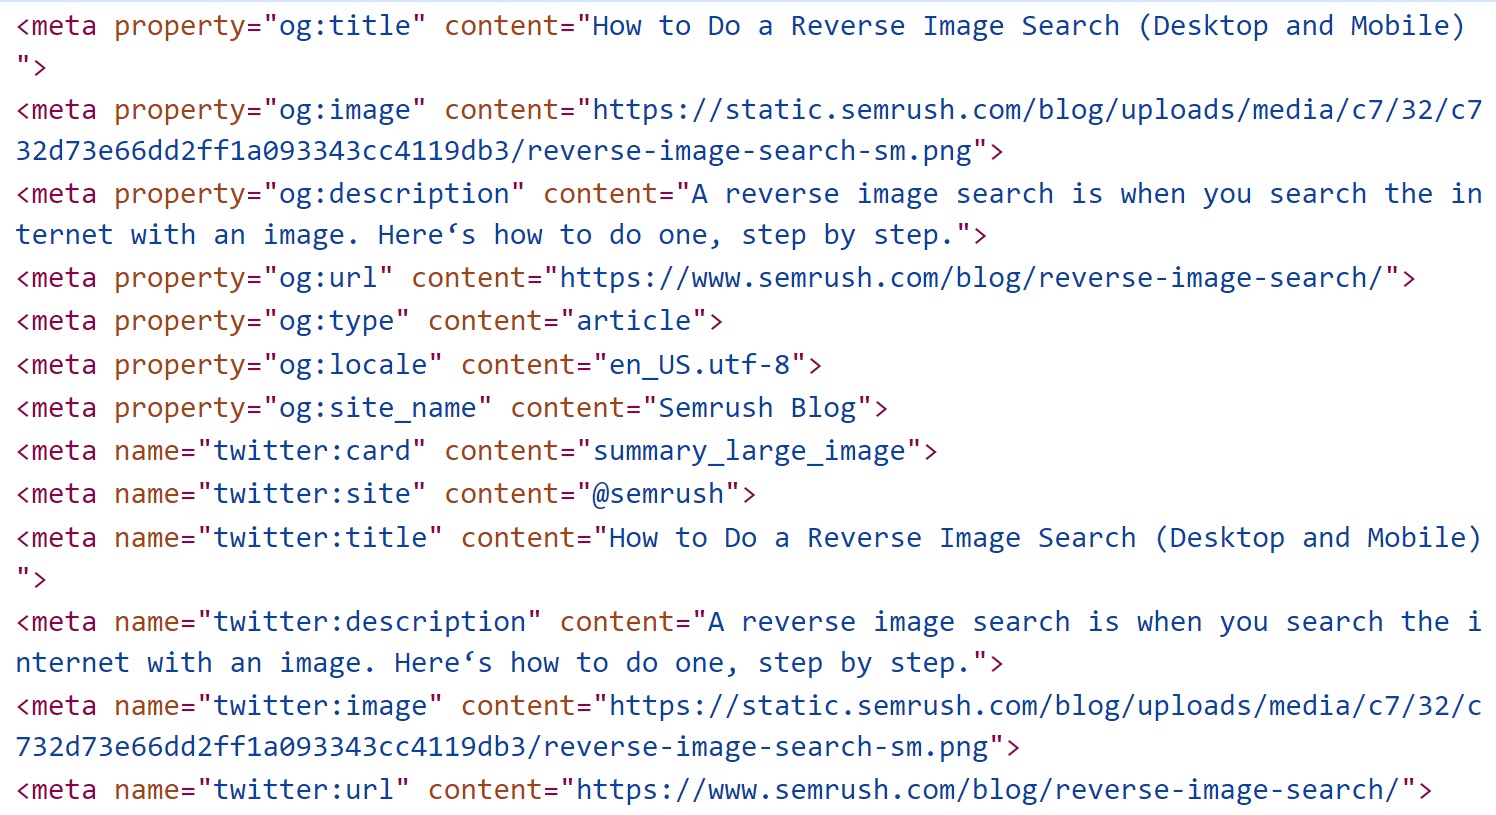
Of course, there are more than just three tags. And nuances to implementing them.
Before diving into that, let’s explore why Open Graph tags matter.
Why Open Graph Matters for Maximizing Social Media Engagement
Open Graph is paramount for maximizing your reach on social media platforms. Here are four key reasons why:
1. Polished Look
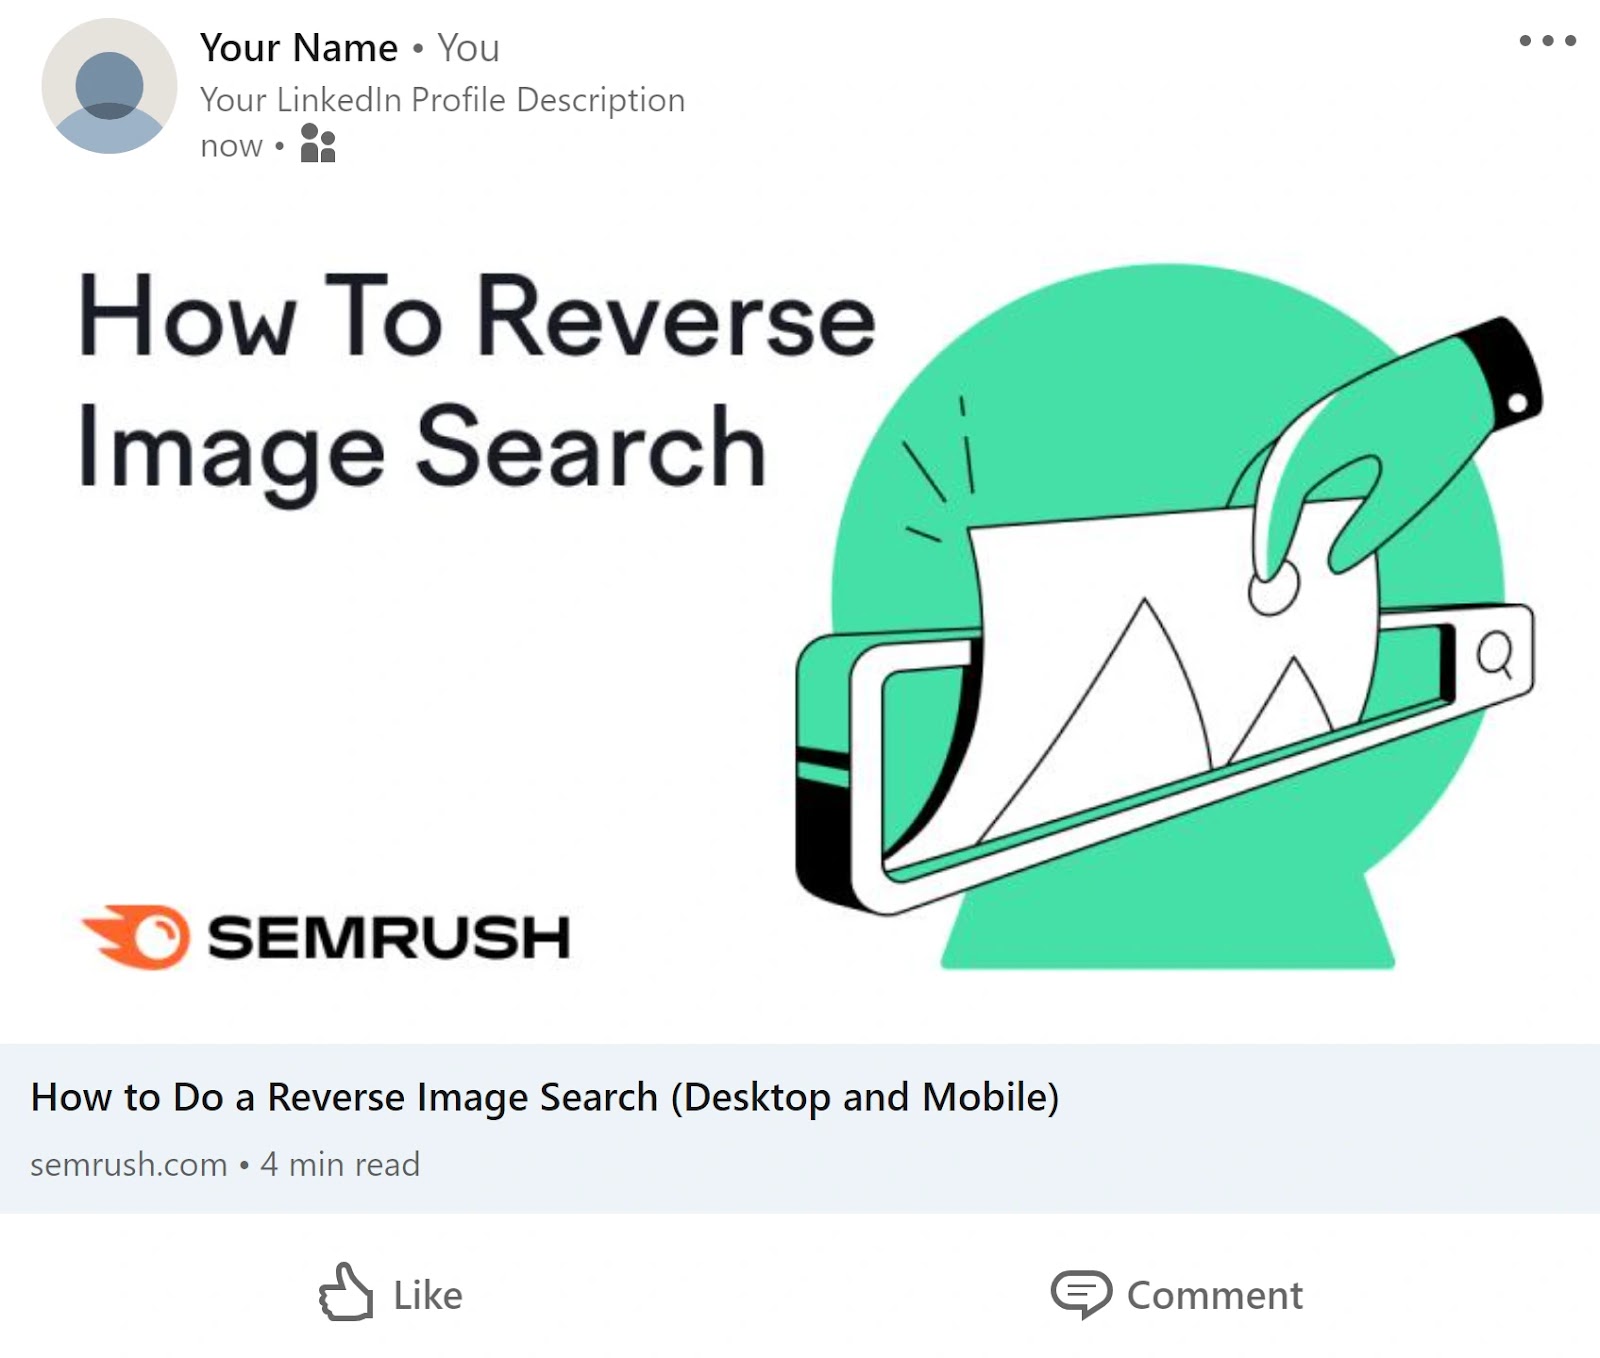
First, Open Graph transforms URLs into rich, eye-catching “cards” when shared on social platforms like Facebook, X (formerly Twitter), LinkedIn, and more.

These visual previews, which include a title, description, and image, are far more engaging than plain old links. It’s like going from black and white TV to high-definition color.
2. Full Control Over Your Content
With Open Graph, you’re in the driver’s seat. Instead of letting social platforms decide how to present your content, you can control the narrative.
You can define the title, description, image, and even the type of content you are sharing. In the world of online marketing, control is critical, and Open Graph gives it to you on a silver platter.
3. Higher Click-Through Rates
Enriched previews significantly increase click-through rates (CTRs). For instance, posts with images on Facebook get 2.3 times more engagement than those without images.
So not only can more people see your content, but they’ll also be more likely to click on it. A win-win.
4. Improved Brand Consistency
Open Graph tags also promote brand consistency by providing a standard look and feel across all social media platforms.
The tags ensure the same title, description, and image are displayed every time your link is shared. This reinforces your brand image and makes it easily identifiable for users.
In a nutshell, Open Graph is like that secret ingredient that takes your social media recipe from good to great.
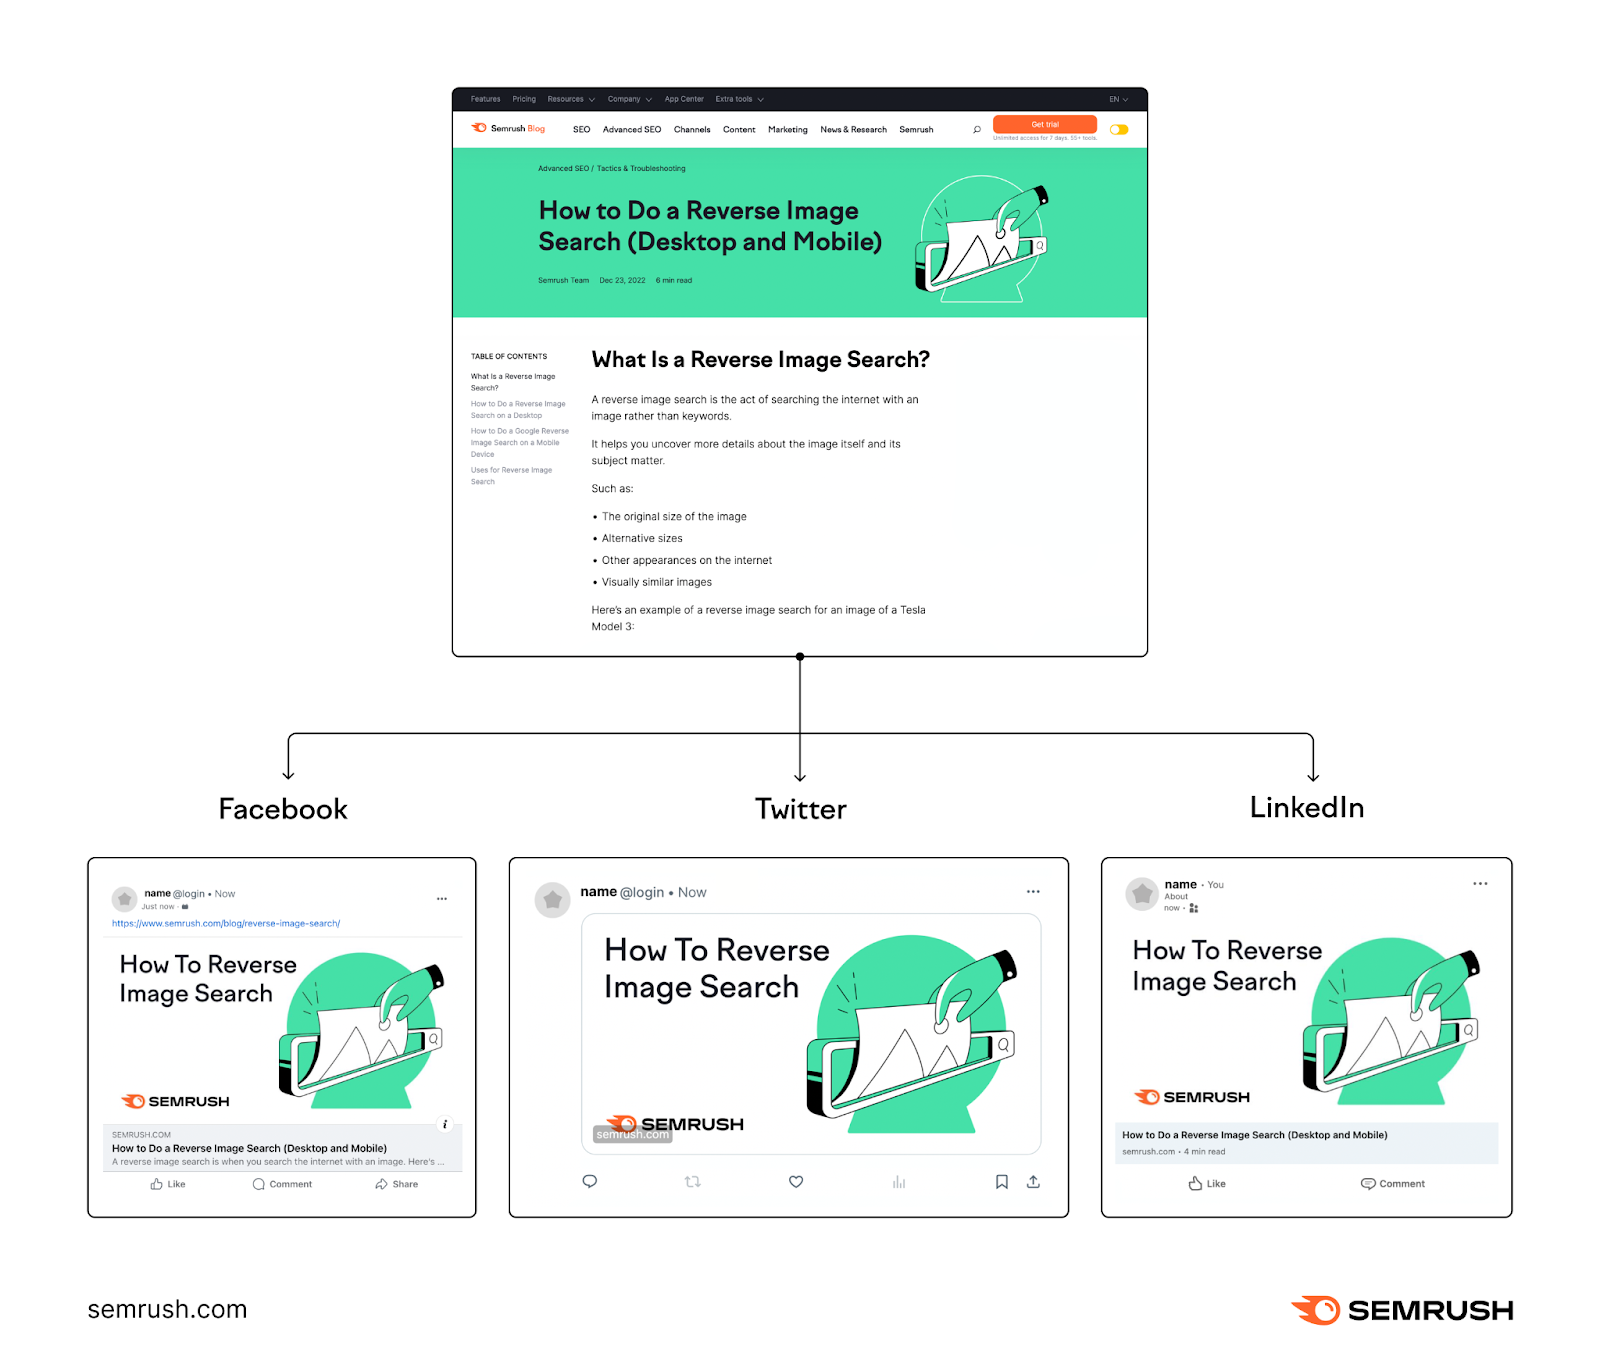
Open Graph Tags to Know
Remember we promised there are more Open Graph tags than those for title, description, and image?
Here are the most commonly used ones—along with an indication of whether they are required or optional:
og:title (Required)
Specifies the title of your content. Think of it as the headline that needs to grab the user’s attention.
Code
<meta property="og:title" content="Insert Your Title Here">Best Practices
- Be accurate: Ensure that the “og:title” accurately represents the content of the page. Otherwise, you might end up clickbaiting users.
- Be concise: Keep the title under 60 characters
- Be engaging: Make it capture users’ attention and encourage them to click. If you feel writer’s block, try Semrush’s AI-powered Title Generator for catchy social media headlines.
- Avoid all caps: All capital letters in the “og:title” can be considered overly aggressive. Avoid them.
- Integrate branding: If appropriate, incorporate your brand name or logo into the “og:title” to enhance brand recognition
Example
Say we’re looking at a blog post on Semrush about reverse image search.
When shared on social media, it looks great:
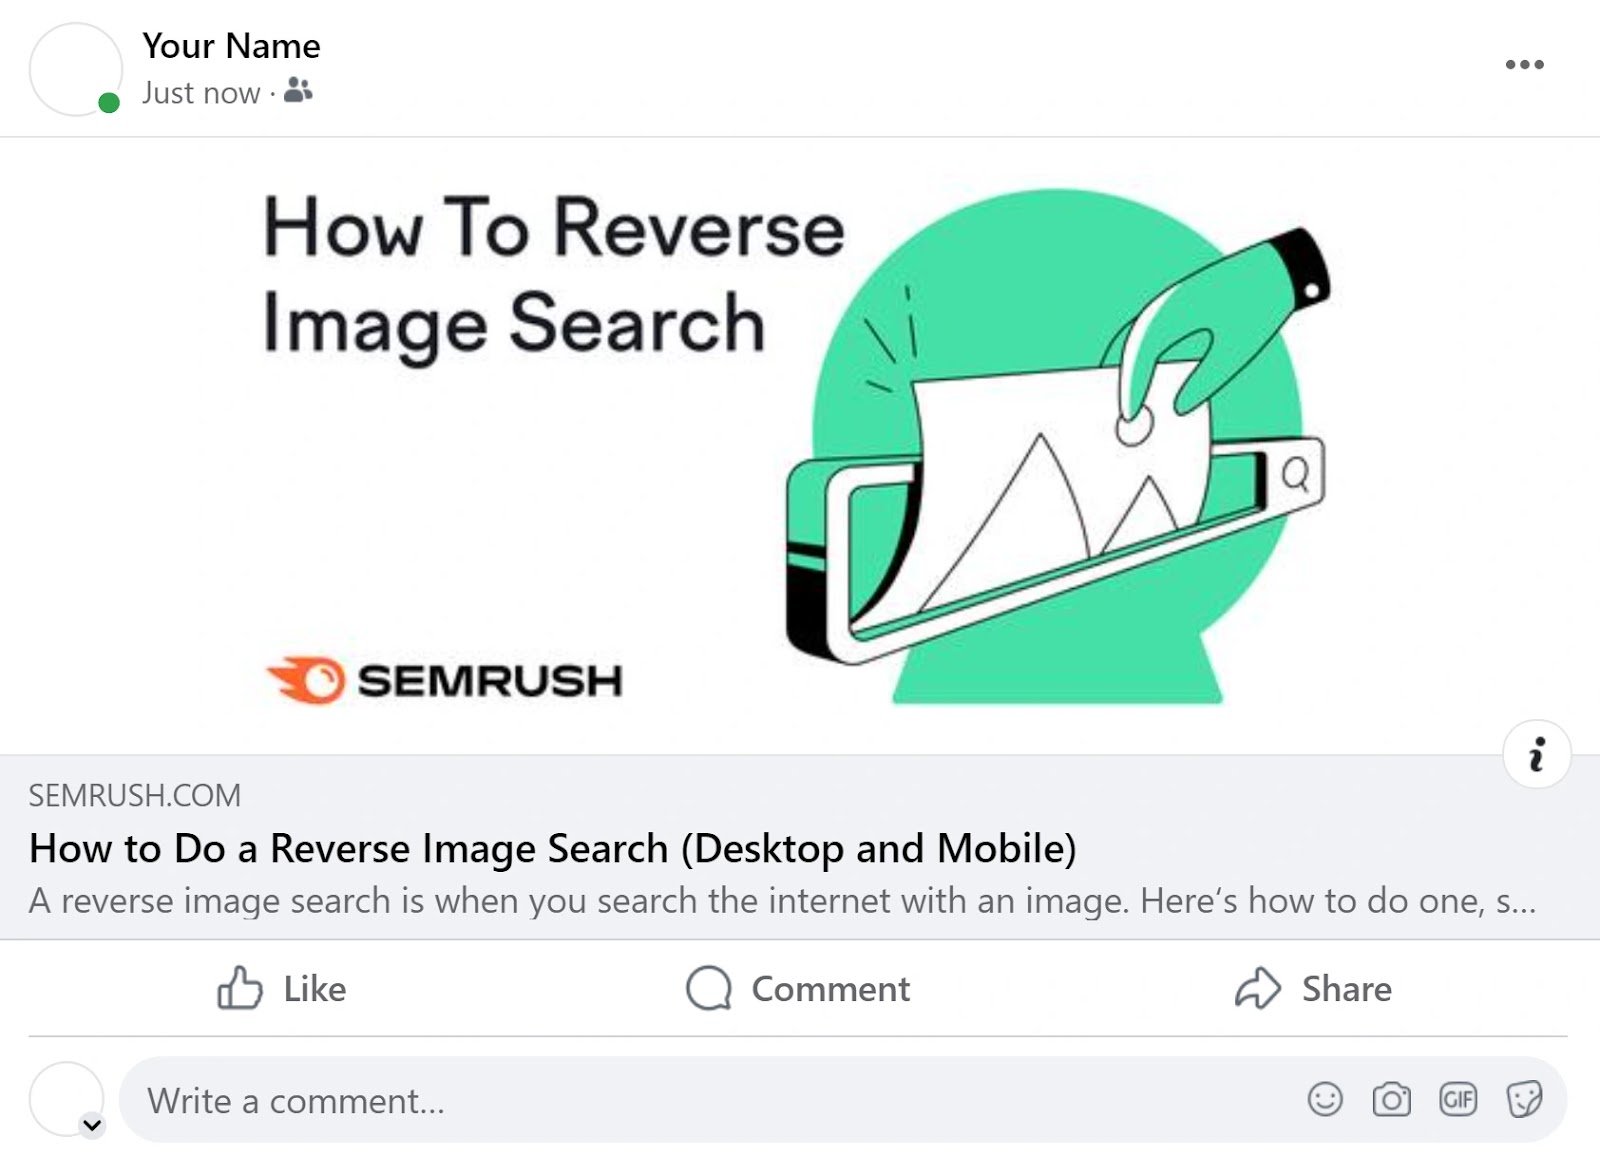
The og:title in this case is:
<meta property="og:title" content="How to Do a Reverse Image Search (Desktop and Mobile)">og:type (Required)
Identifies the type of your content. The main accepted values are:
- website
- article
- book
- video.movie
- music.song
Code
<meta property="og:type" content="Insert the type here" />Substitute “website” through any of the values above.
Best Practices
- Choose the correct type: Select the most relevant “og:type” that accurately represents the content (see list above)
- Handle mixed content: If a page contains various types of content—e.g., an article with embedded videos—choose the dominant type for the “og:type” tag
Example
For our blog on reverse image search:
<meta property="og:type" content="article">og:image (Required)
Defines the image that will appear on the social media platform. The right image can significantly increase user engagement.
Code
<meta property="og:image" content="Insert image URL here">Best Practices
- Choose the right size: The recommended image size for Open Graph meta tags is 1200 x 630 pixels. These dimensions fit within the display parameters of most social media platforms, ensuring your image displays without being cropped. If you download and inspect the sample tag below, you’ll see it is 1200 x 630.
- Choose the right file format: JPEG and PNG are the safest bets. These two formats are widely accepted and retain image quality well.
- Make it high-resolution: Choose high-quality images that will look good on any device. We recommend JPEG for images with lots of colors and PNG for those that require transparency.
- Establish relevance: The image should be relevant to the content of your page. Our example for the post on reverse image search shows a hand pulling an image backwards out of a search engine’s search box. Talk about an image saying more than words.
Example
<meta property="og:image" content="https://static.semrush.com/blog/uploads/media/c7/32/c732d73e66dd2ff1a093343cc4119db3/reverse-image-search-sm.png">og:url (Required)
The canonical URL of your content. It tells social media platforms where to find the original content.
Code
<meta property="og:url" content="Insert your canonical URL here">Best Practices
- Provide the canonical URL of your piece of content; i.e., the main version if there are duplicates. For example the canonical URL of “https://example.com/blog?page=1” would likely be “https://example.com/blog”
- Provide the exact URL (e.g. with or without trailing slash, with or without “www” etc.
Example
<meta property="og:url" content="https://www.semrush.com/blog/reverse-image-search/">og:description (Optional)
Provides a summary of your content. The description should let your potential readers know what benefits they’ll reap from spending their attention on it.
Code
<meta property="og:description" content="Insert your description here">Best Practices
Similar to og:title:
- Be accurate: Ensure that the “og:description” accurately represents the page’s content
- Be concise: Limit your description to below 200 characters so it doesn’t get truncated and is quick to read
- Be enticing: Make the description capture users’ attention and encourage them to click
- Avoid all caps: You don’t want to seem like you’re yelling in the “og:description.”
Example
<meta property="og:description" content="A reverse image search is when you search the internet with an image. Here‘s how to do one, step by step.">og:site_name (Optional)
The name of your website or brand.
Code
<meta property="og:site_name" content="Insert your brand name here">Best Practices
- Be recognizable: Choose a name that users will quickly recognize you by. Could be your website or brand name, but also an inflection of it (see example).
Example
<meta property="og:site_name" content="Semrush Blog">og:locale (Optional)
Specifies the language used on your website. It helps in categorizing your content accurately for users from different regions.
Code
<meta property="og:locale" content="Insert language and country in correct format">Best Practices
- Choose the right order: Provide the language first and then the country
- Choose the right format: Provide language and country in the form “language_COUNTRY”. Use official language and country codes for both (see example below).
- Provide various locales (or none at all): If you want to target more than one country or language, provide the core locale first. Then use “og:locale:alternate” to specify secondary ones. If you want to target the English-speaking U.S. only, you don’t need to specify any og:locale.
Example
<meta property="og:locale" content="en_US">
<meta property="og:locale:alternate" content="en_GB />
Setting Up Open Graph Meta Tags
Here’s a step-by-step guide on how to set up Open Graph meta tags for our Semrush post onreverse image search. We’ll also cover different content management systems and the manual approach.
How to Set Open Graph Meta Tags in WordPress
Step 1: Install Yoast SEO
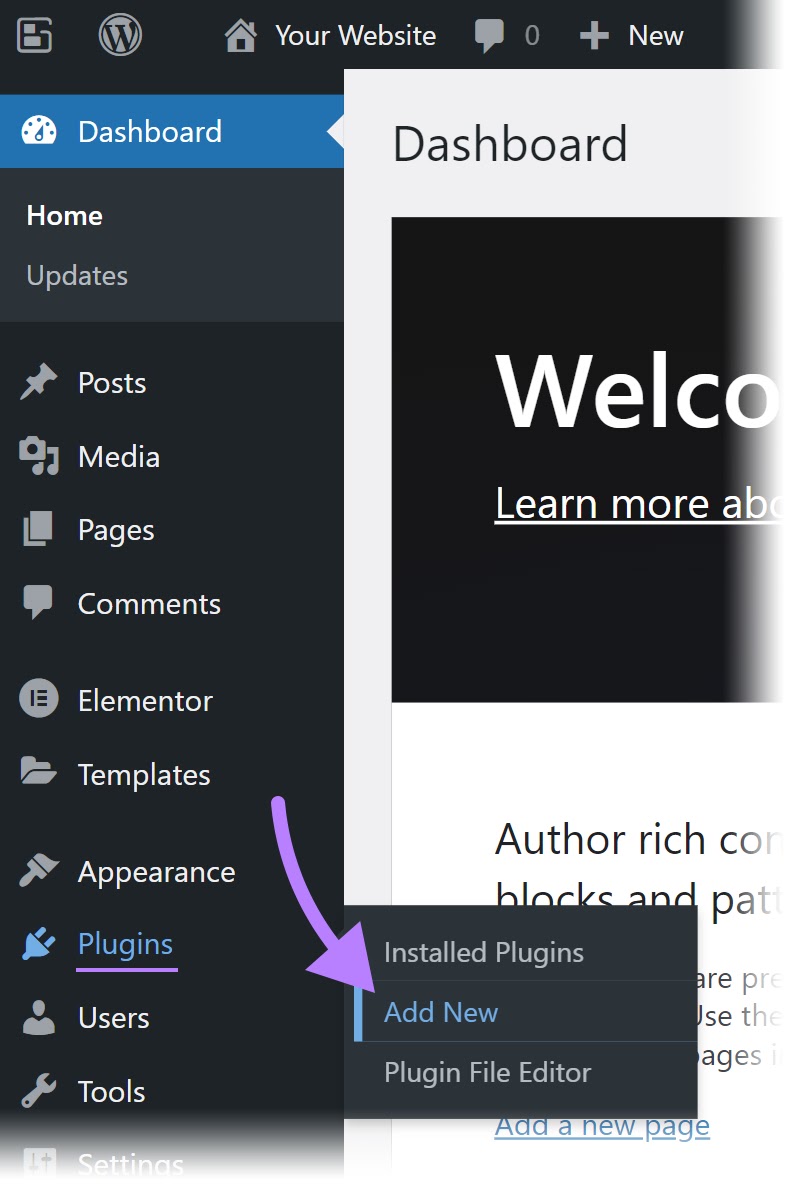
Open your WordPress backend and click “Plugins” > “Add New.”
In the search box, type “Yoast SEO.”
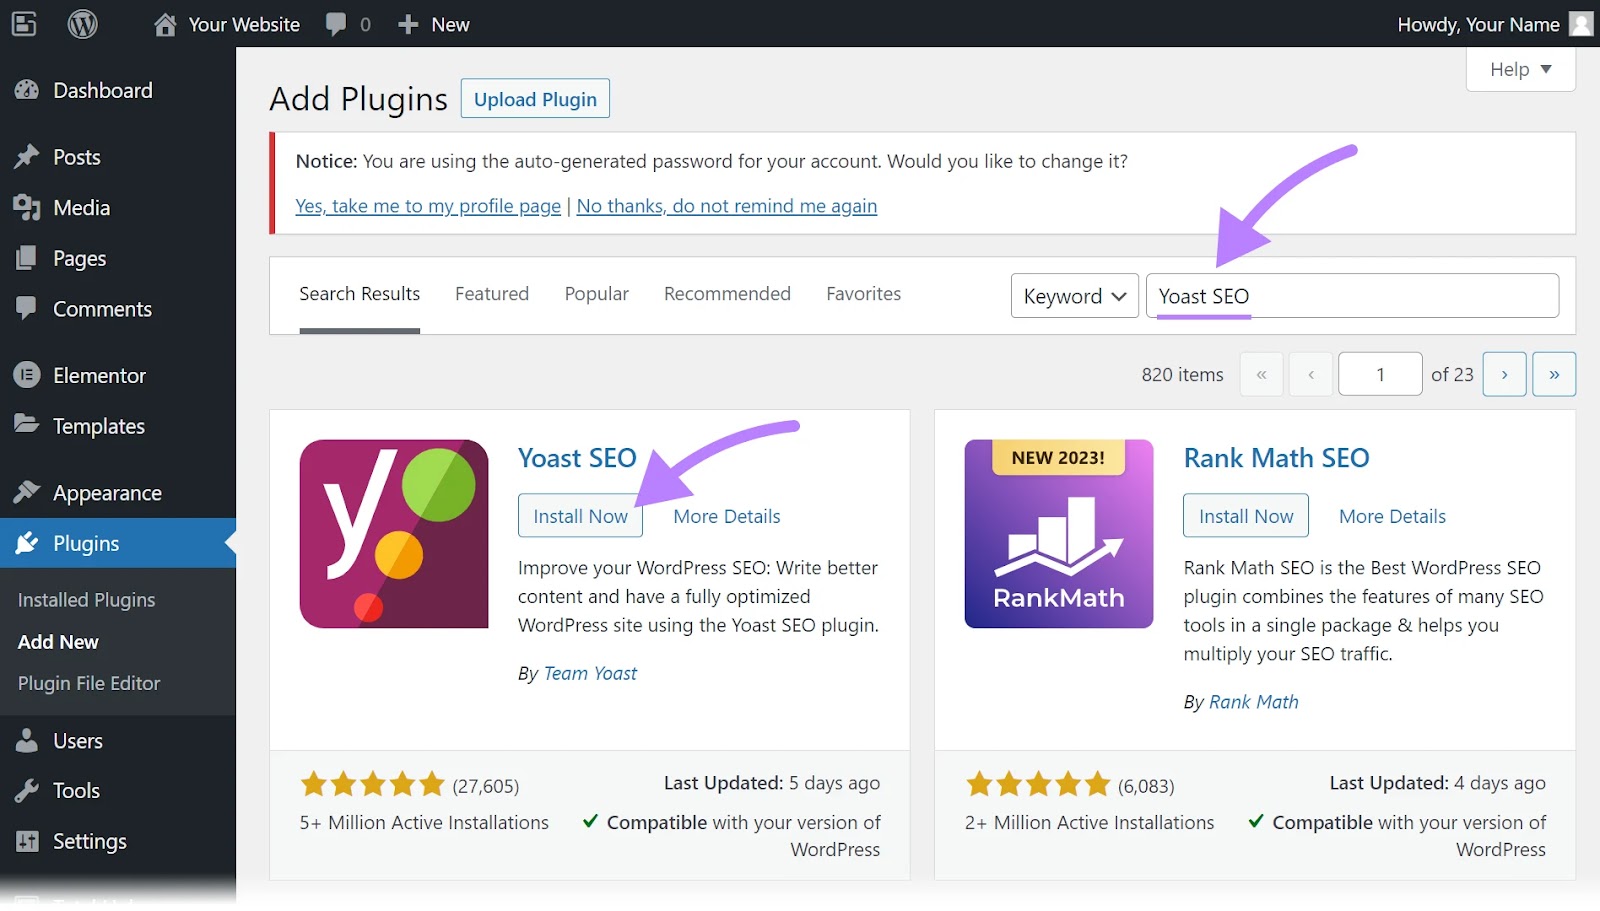
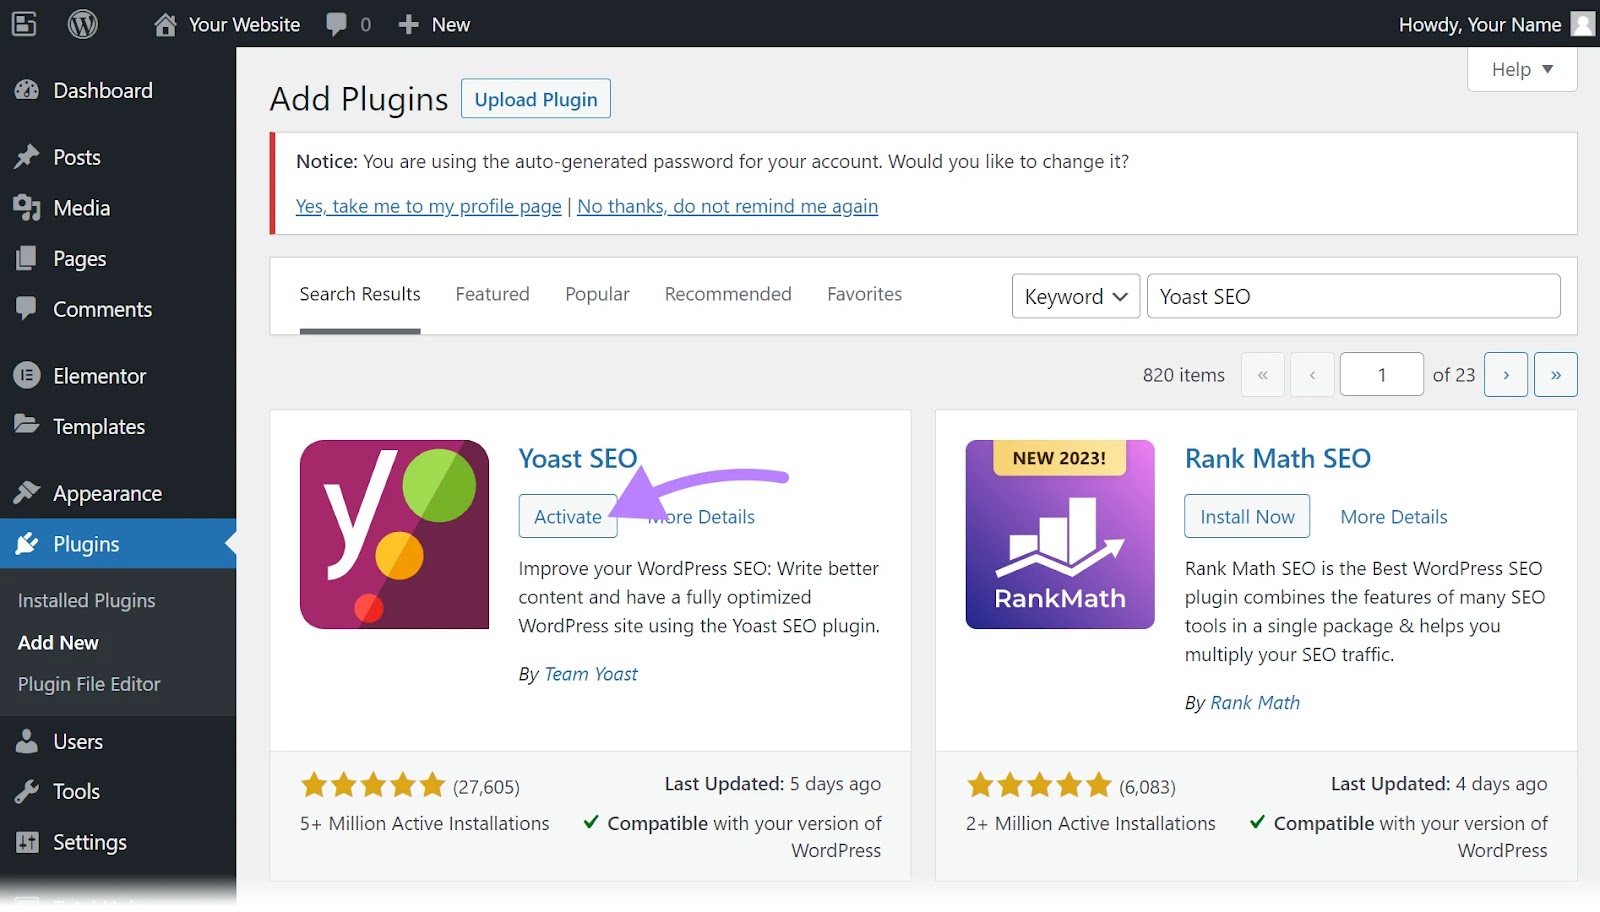
Choose “Install Now,” and wait for the installation to finish.
On the following screen, hit “Activate.”
Step 2: Configure the Plugin
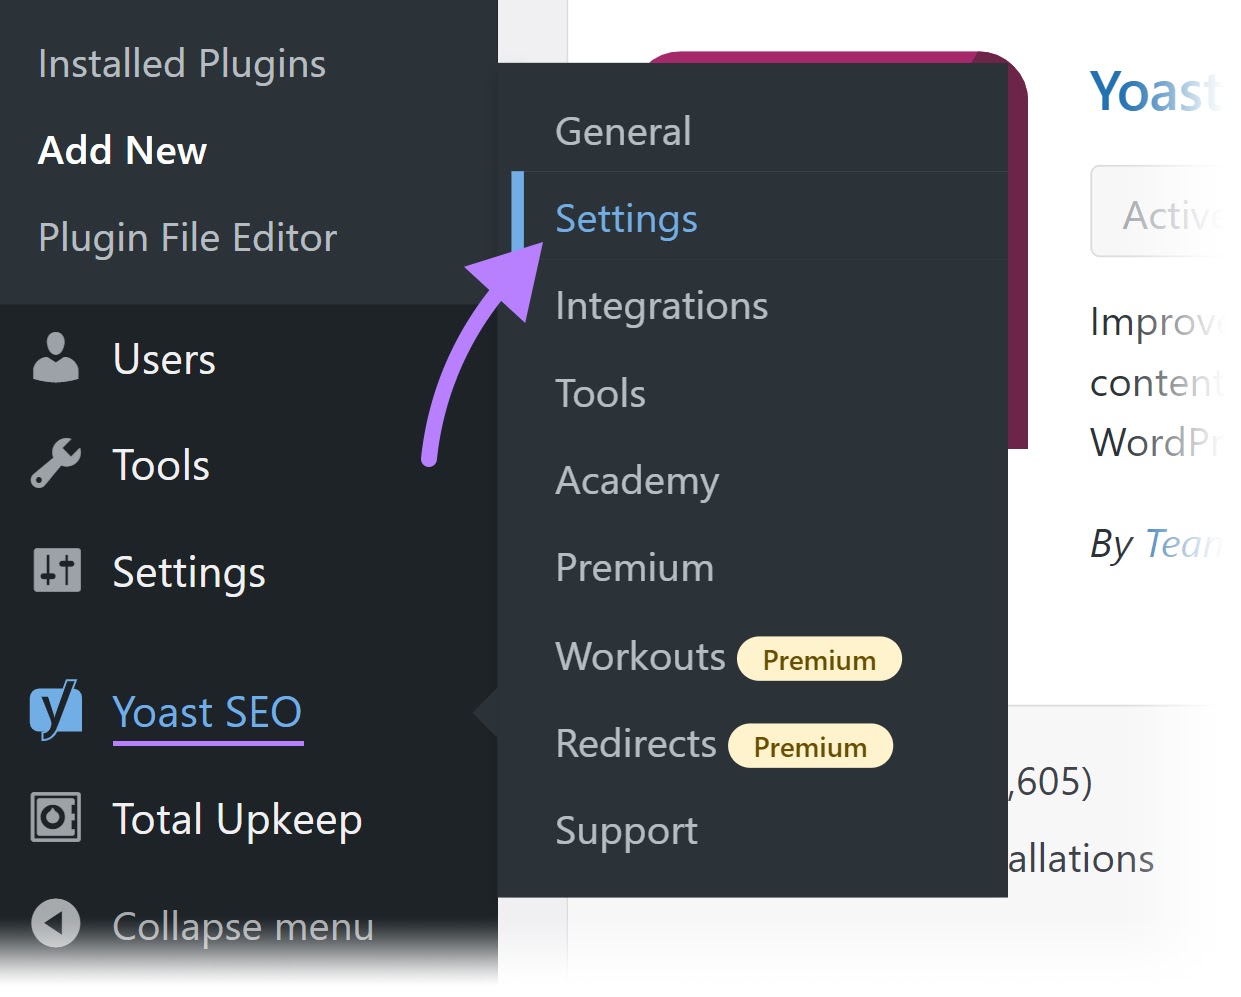
Head to the newly created “Yoast SEO” section in the left-hand sidebar and click “Settings.”
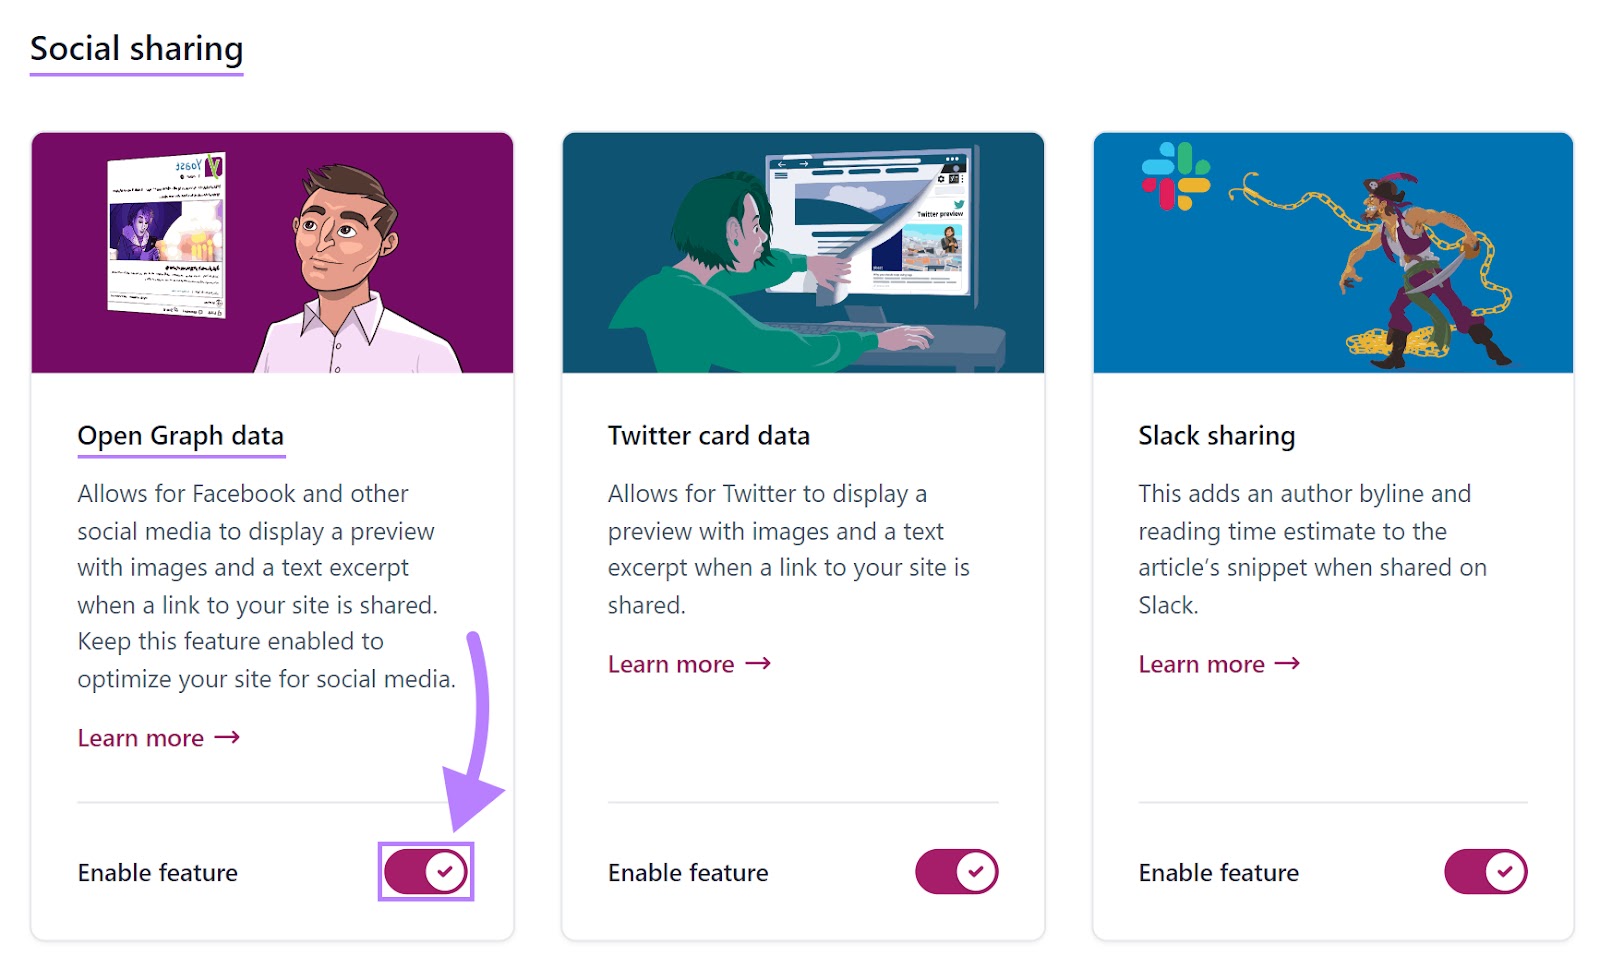
You’ll find yourself in the site features section of Yoast SEO. Scroll down to the heading called “Social Sharing” and make sure the toggle under the card “Open Graph data” is enabled.
Step 3: Check the Tags
Let’s assume we executed steps one and two. (We haven’t. This is just to illustrate the result.)
Now, we’d inspect the HTML of our Semrush post on reverse image search.
Yoast would have added all the following Open Graph meta tags automatically.

Yoast automatically pulls the information inside the content attributes from various places in WordPress:
| Value of Content Attribute | Copied From |
| og:title | “SEO title” defined in the Yoast SEO box inside the post editor |
| og:description | “Meta description” defined in the Yoast SEO box inside the post editor |
| og:image | Featured image of the post |
| og:url | URL of the post |
| og:type | “Article type” defined under “Yoast SEO” > “Settings” > “Posts” |
| og:site_name | “Website name” defined under “Yoast SEO” > “Settings” > “Site basics” |
| og:locale | “Site language” defined under “Settings” > “General” |
Step 4 (Optional): Customize the Tags
Open Graph is all about making your content more appealing—specifically for social media.
Sometimes that may mean using a title, image, or description different from the one on your website.
To do so, head to “Post” > “All Posts.”
Type “Reverse Image Search” in the search box and hit “Search Posts.”
Click “Edit” underneath the post to pull up the post editor.
Inside the editor, scroll all the way down to the “Yoast SEO” box and click on the “Social” tab at the top.
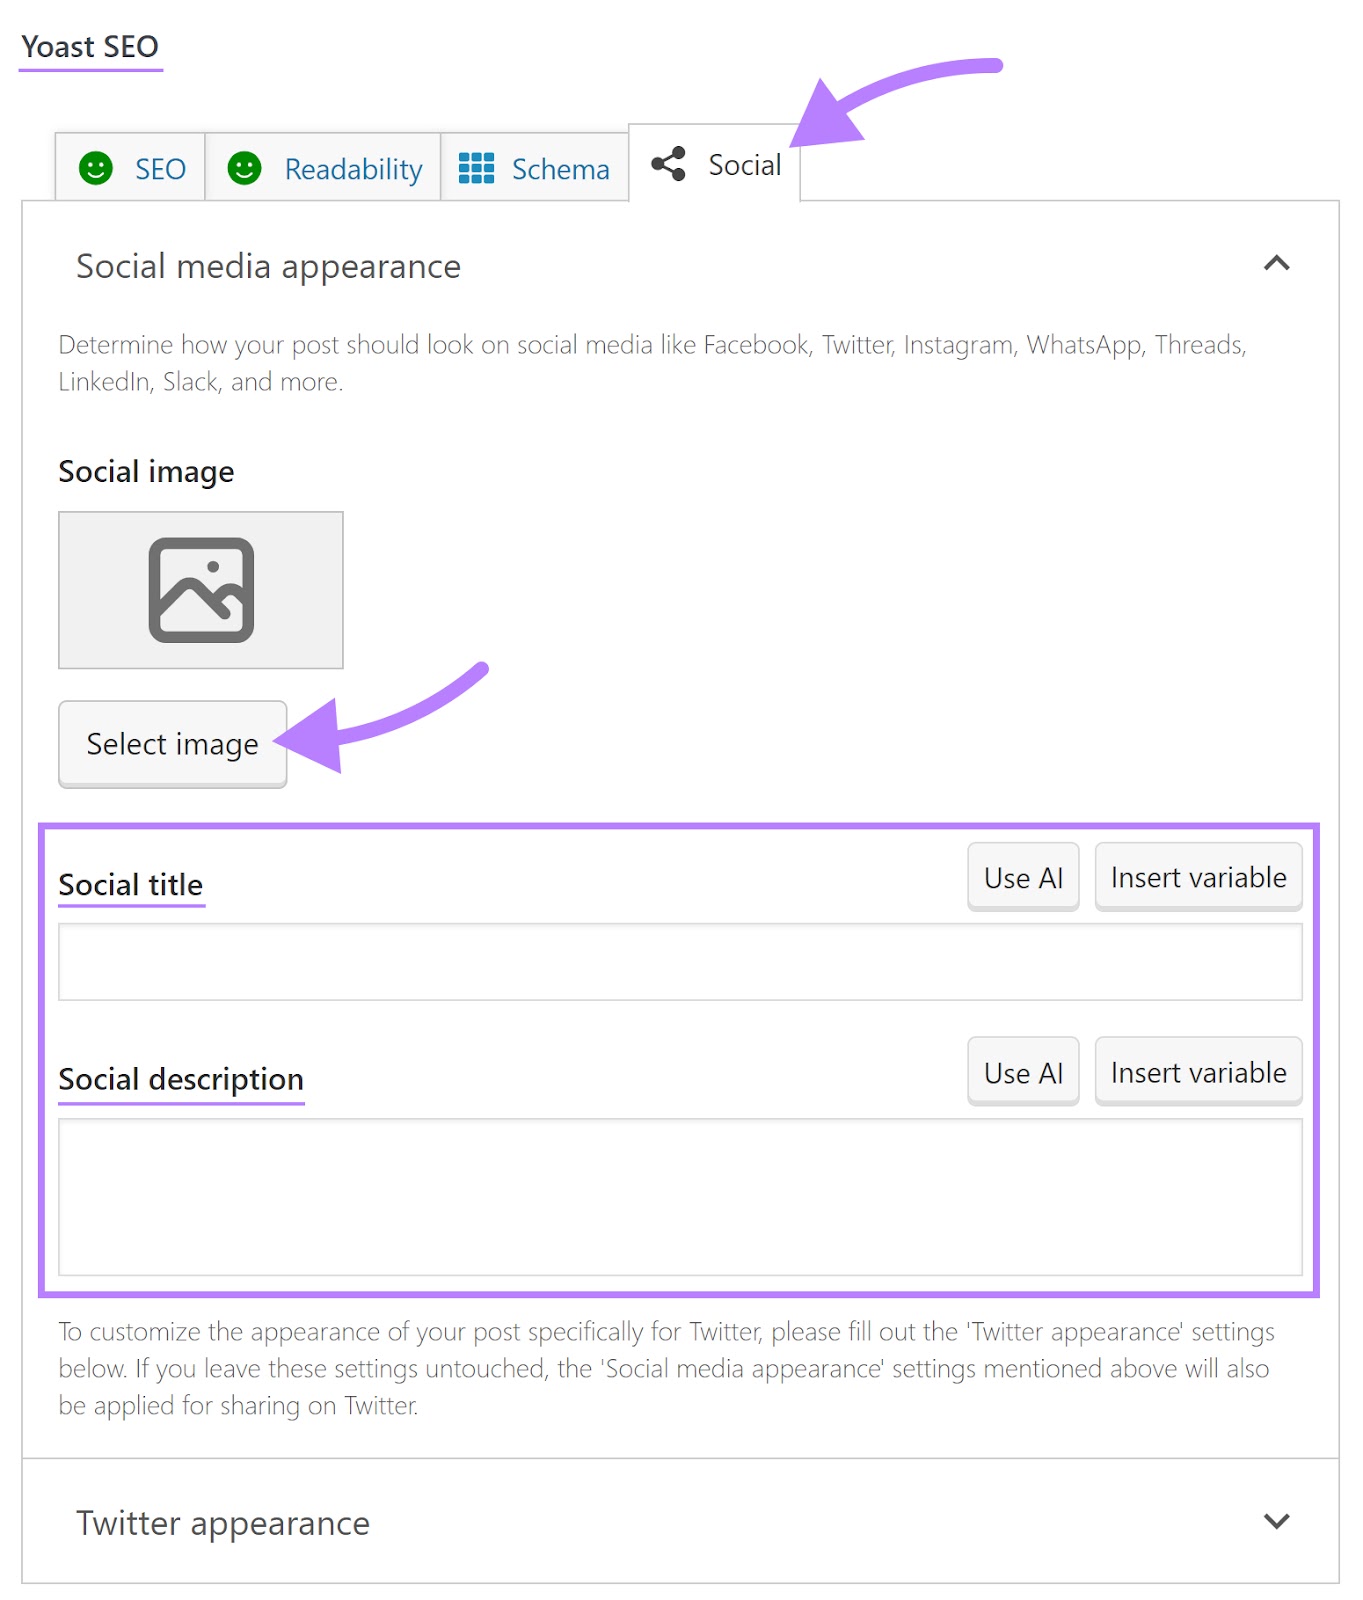
Now you can change the og:image tag by changing the “Facebook image” via “Select image.”
You can do the same for og:description via the text box under “Facebook description.”
Once you hit the “Update” button at the top of the editor, the customized Open Graph meta tags are saved and should show up in the HTML of the blog post.
How to Set Up Open Graph Meta Tags in Wix
From the get-go, Wix automatically adds Open Graph meta tags to your pages.
It pulls the values for the tags from various places that change by page type.
For instance:
- The og:image value on blog posts equals your post cover image
- The og:image value on product pages equals your product image
You can change those values though if you like.
Step 1: Access Wix’s SEO Settings
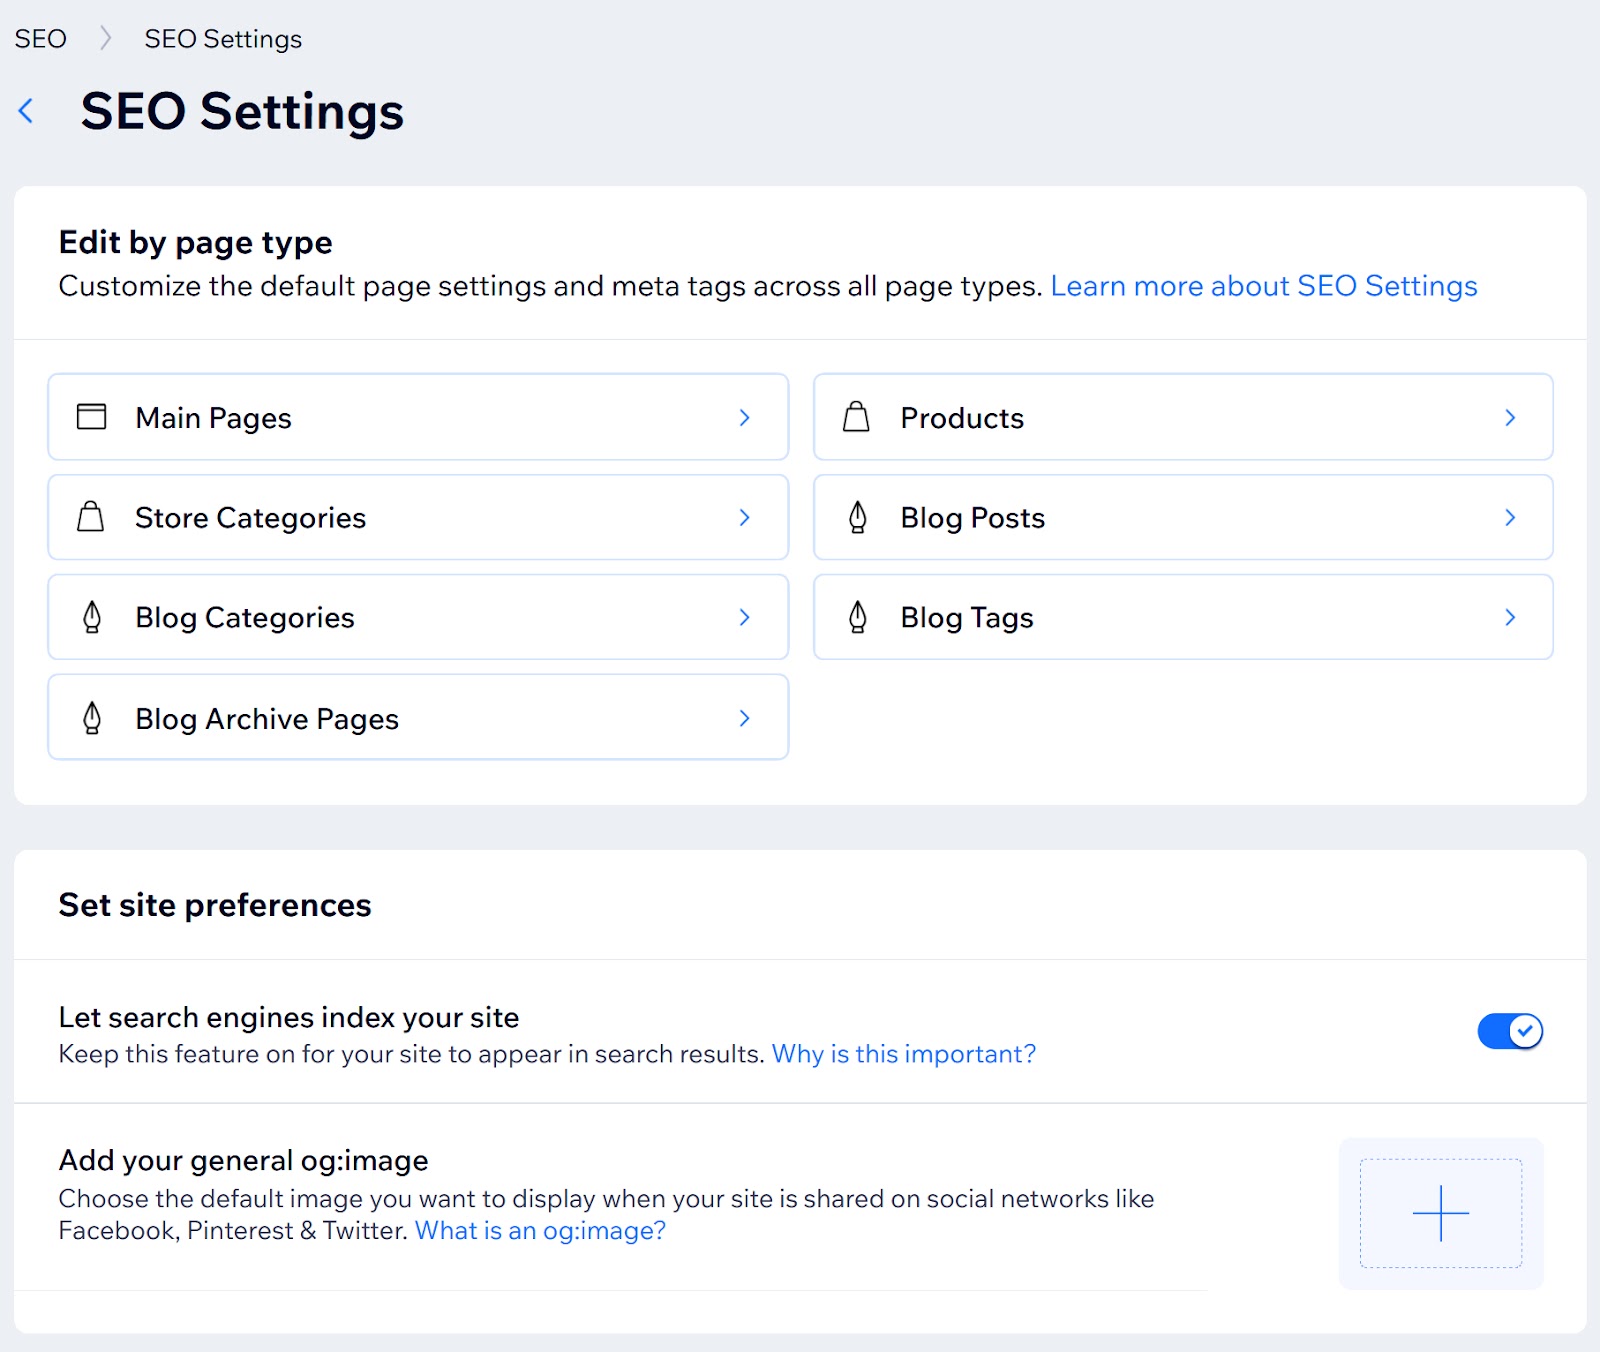
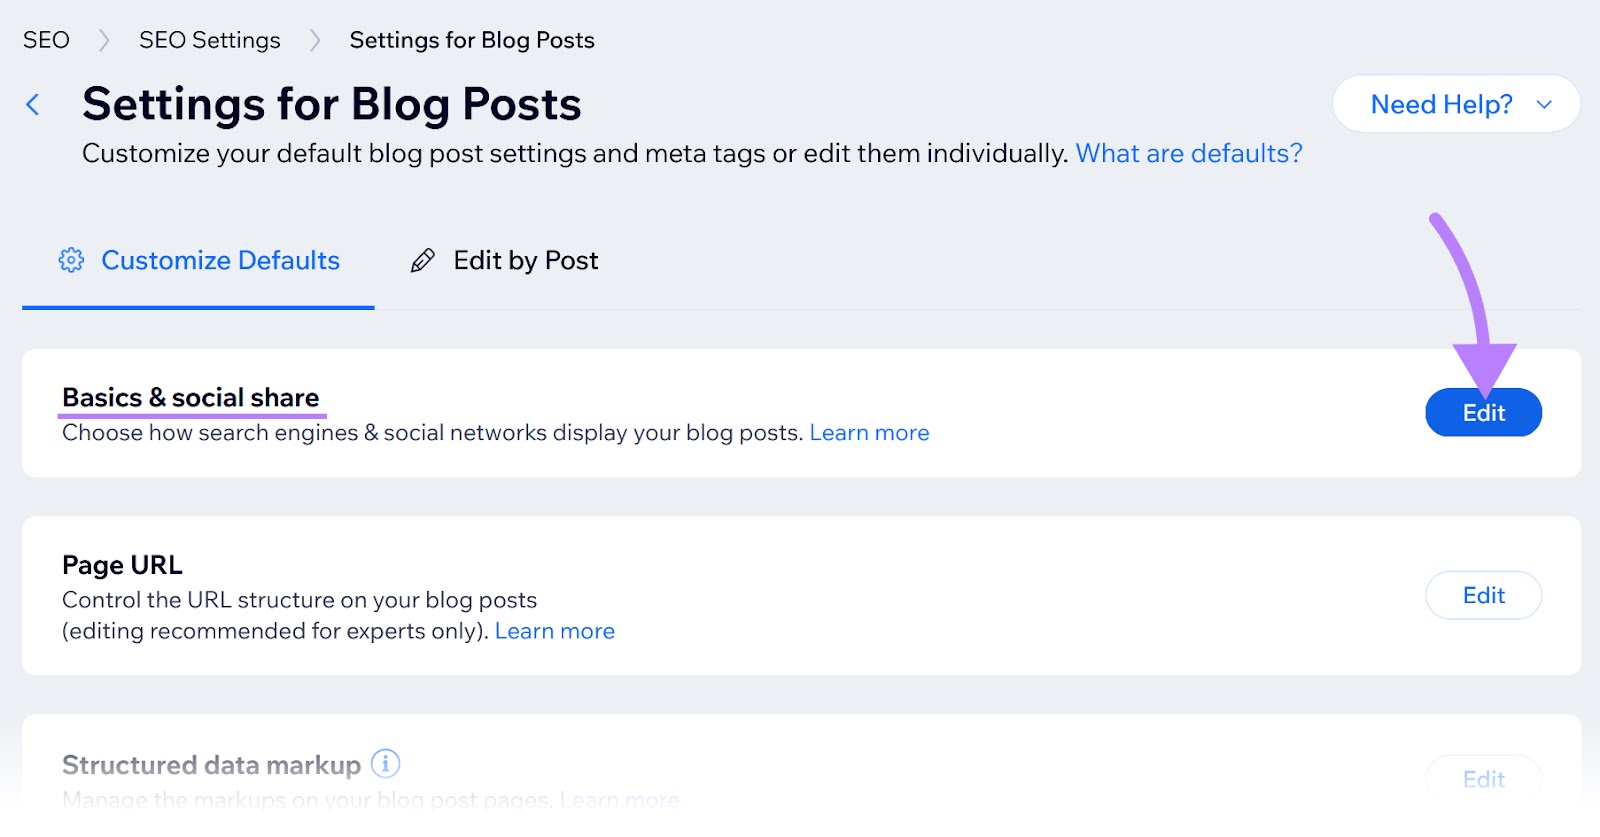
From your dashboard, head to “Marketing & SEO” > “SEO” > “SEO Settings.”
Step 2: Open the Social Share Settings by Page Type
Click the page type you want to edit.
In the next screen, click “Basics & social share.” Then, hit “Edit.”
Step 3: Change the Open Graph Variables to Custom Values
You’ll now see boxes for “og:title,” “og:description,” and “og:image.” Change them by deleting the variable chip and providing a value of your choice.
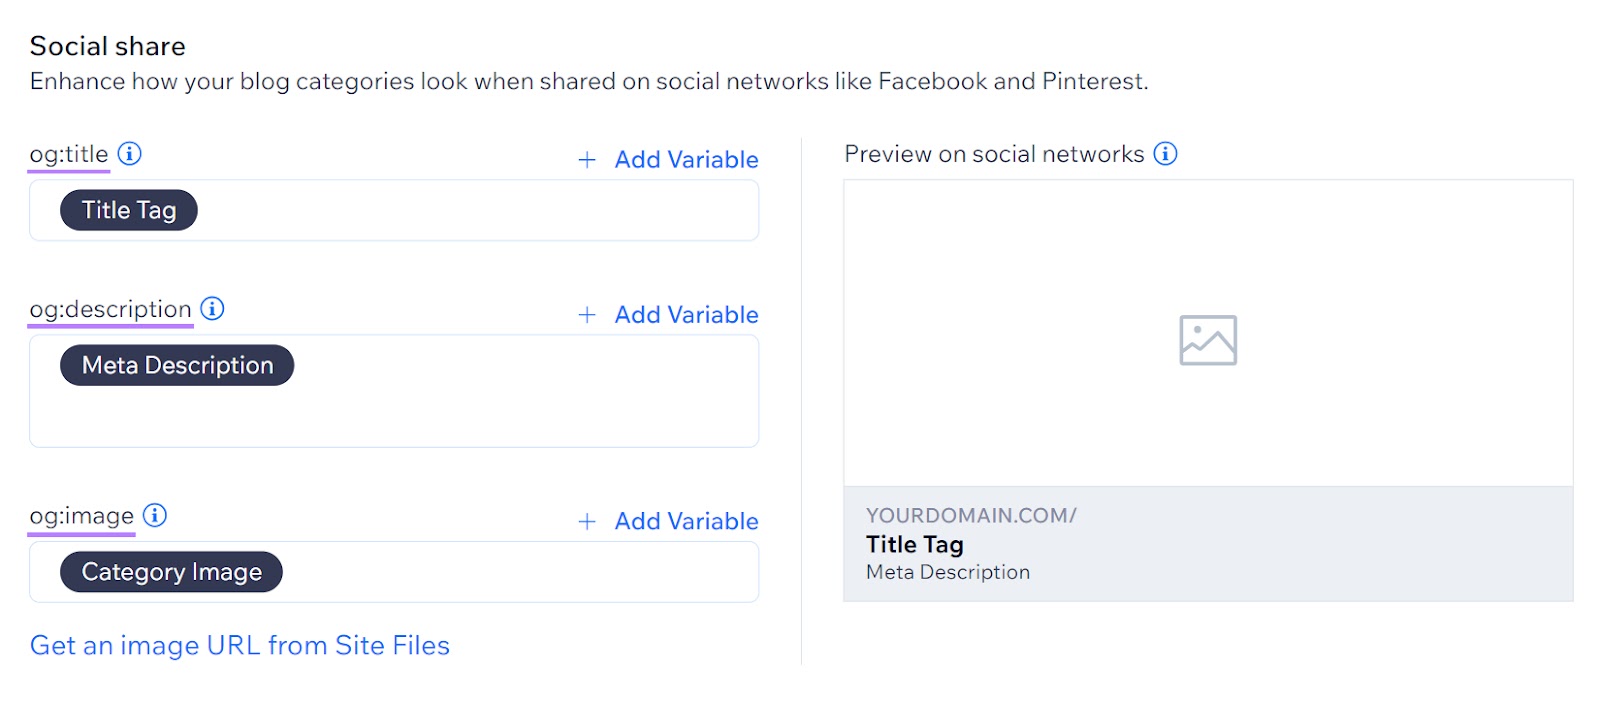
Hit “Save” and exit the social share settings.
How to Set Up Open Graph Meta Tags Manually
What if your website runs on a content management system without a plugin or native settings to add Open Graph meta tags?
You can set them up manually. This involves adding their code to the <head> section of your webpage.
Step 1: Access Your HTML Code
Open the HTML file or template of the webpage you want to add Open Graph meta tags to.
Find the <head> section in the HTML.
Step 2: Add Required Open Graph Meta Tags
Insert the necessary Open Graph meta tags within the <head> section. You’ll find their code in the “Open Graph Tags to Know” above.
How to Test and Debug Open Graph Meta Tags
So, we’ve set up your Open Graph meta tags. Great!
But how can we be sure they’re showing up as intended? That’s where testing and debugging comes in.
Here are the steps to ensure Open Graph meta tags are boosting your social media engagement:
Step 1: Paste Your Post URL Into a Debug Tool
Most social media platforms have a debugger for checking Open Graph meta tags. The most important ones are:
- Facebook Sharing Debugger
- Twitter Card Validator (still being called that way despite the rebranding to “X”)
- LinkedIn Post Inspector
All debuggers work according to the same logic. We’ll illustrate that logic using the Facebook debugger.
Simply paste your URL into the input box and click “Debug.”
Step 2: Check Your tags
After debugging, the tool will show your Open Graph meta tags. Check whether the tags displayed match the ones you’ve set.
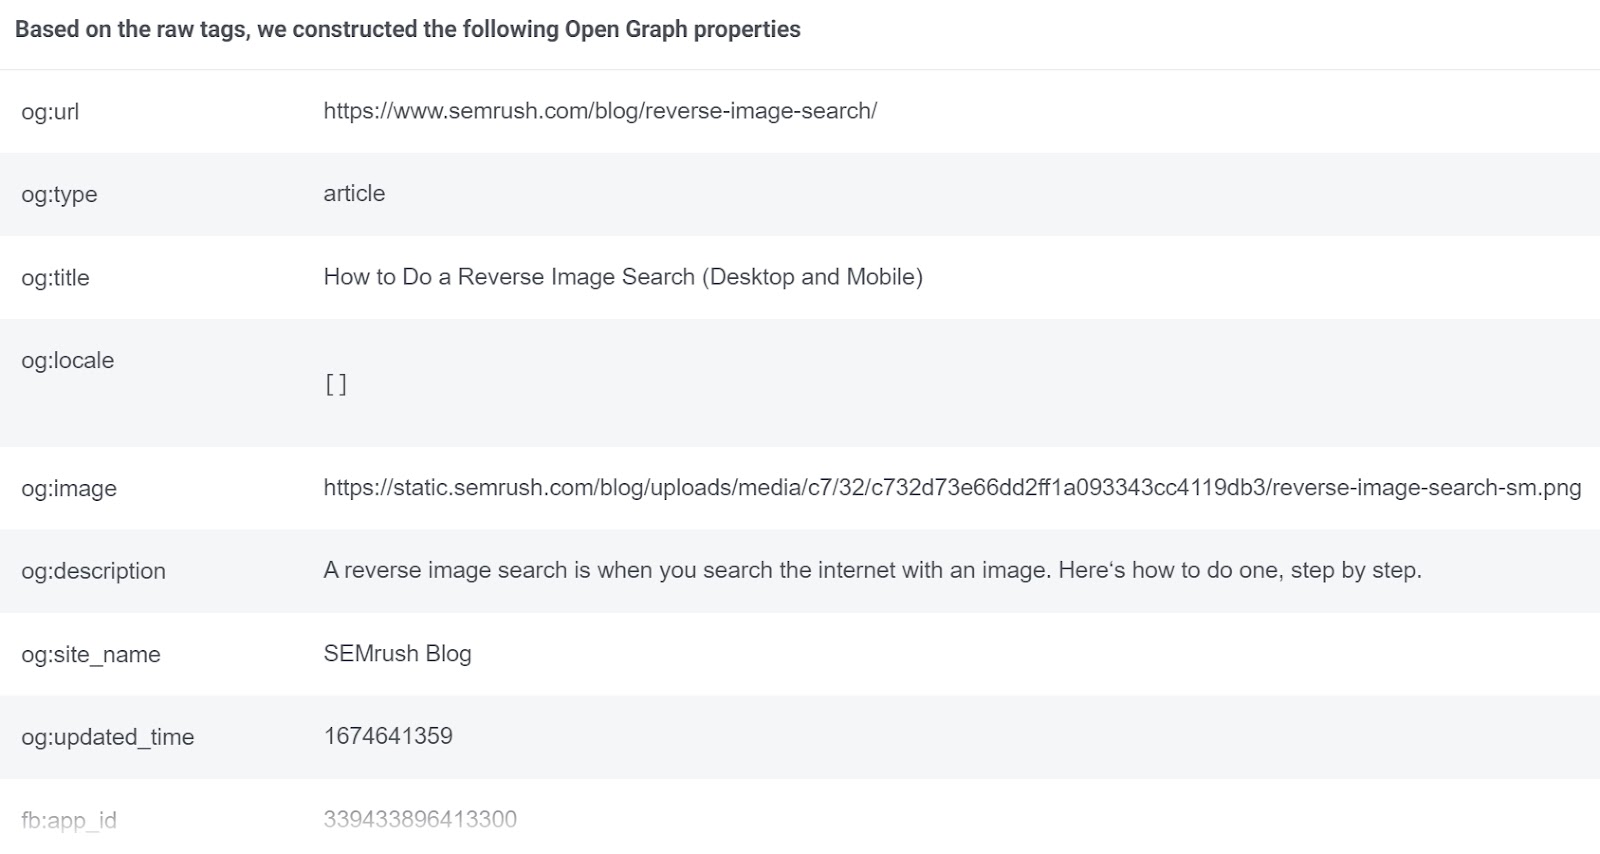
Step 3: Look for Warnings
The Facebook Debugger will also list any potential issues.
If there are warnings, it means there is room for improvement in your tags.
One of the most common mistakes with Open Graph meta tags is incorrect image size.
If that’s the case with your image, Facebook debugger will say something like: “Provided og:image is not big enough. Please use an image that’s at least 200 x 200 px.”
You can also check the “Link Preview” to visually inspect how your image is displayed.
To address the error, change your image to the recommended 1200 x 630 pixels.

Step 4: Scrape Again
Once you’ve made changes to your Open Graph meta tags, hit “Scrape Again” at the top of the page to check if the error has been resolved.
Debugging in Bulk
What if you’ve discovered Open Graph meta tags only now and want to check your whole website for issues with the tags?
Since the Facebook Debugger can only handle one URL at a time, you’d be spending hours to gain an overview.
Instead, try Semrush’s Site Audit tool for debugging Open Graph meta tags in bulk.
Hit “+ Create project,” insert your domain, and hit “Create project” again.
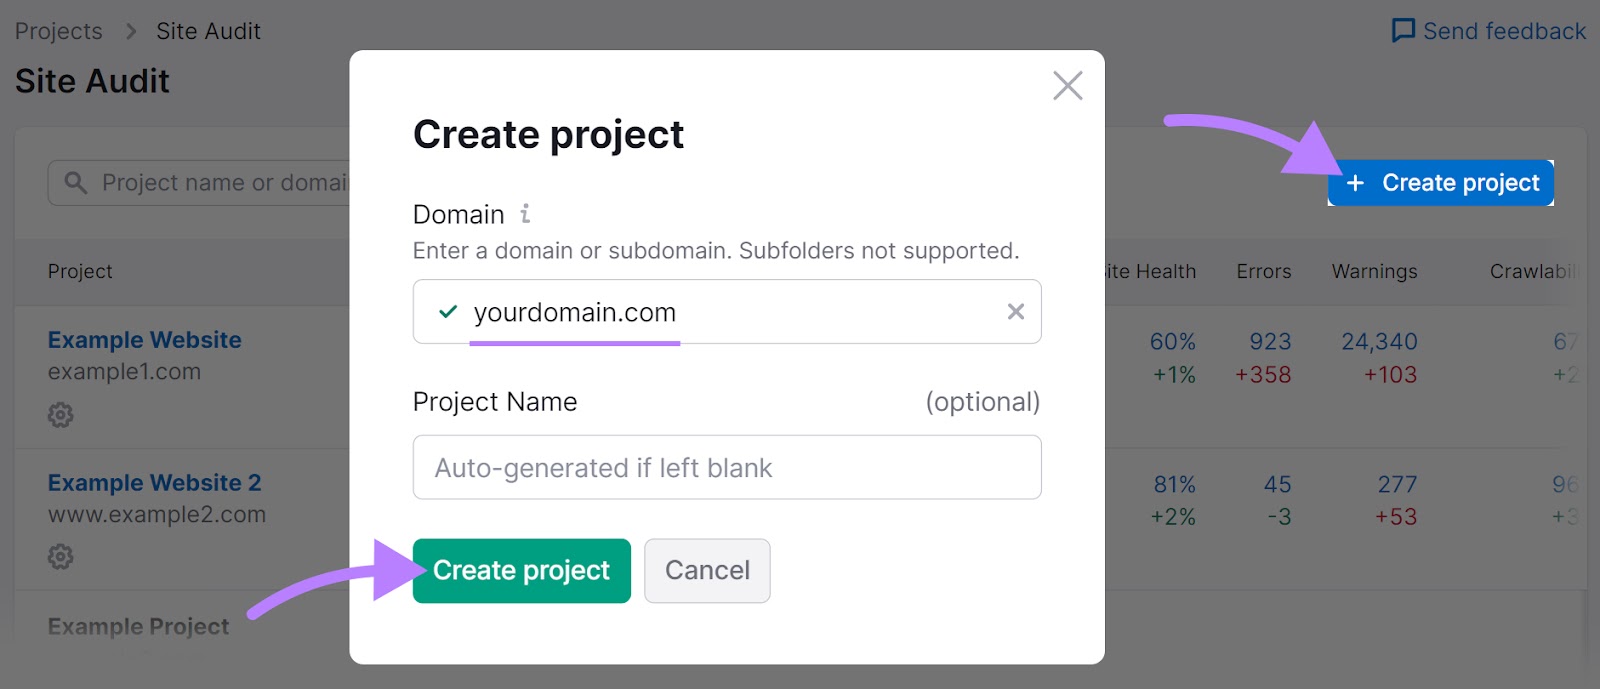
Wait for the audit to finish. Depending on the number of pages to crawl, this can take a bit.
Afterward, click on your domain name to open up the Site Audit Overview.
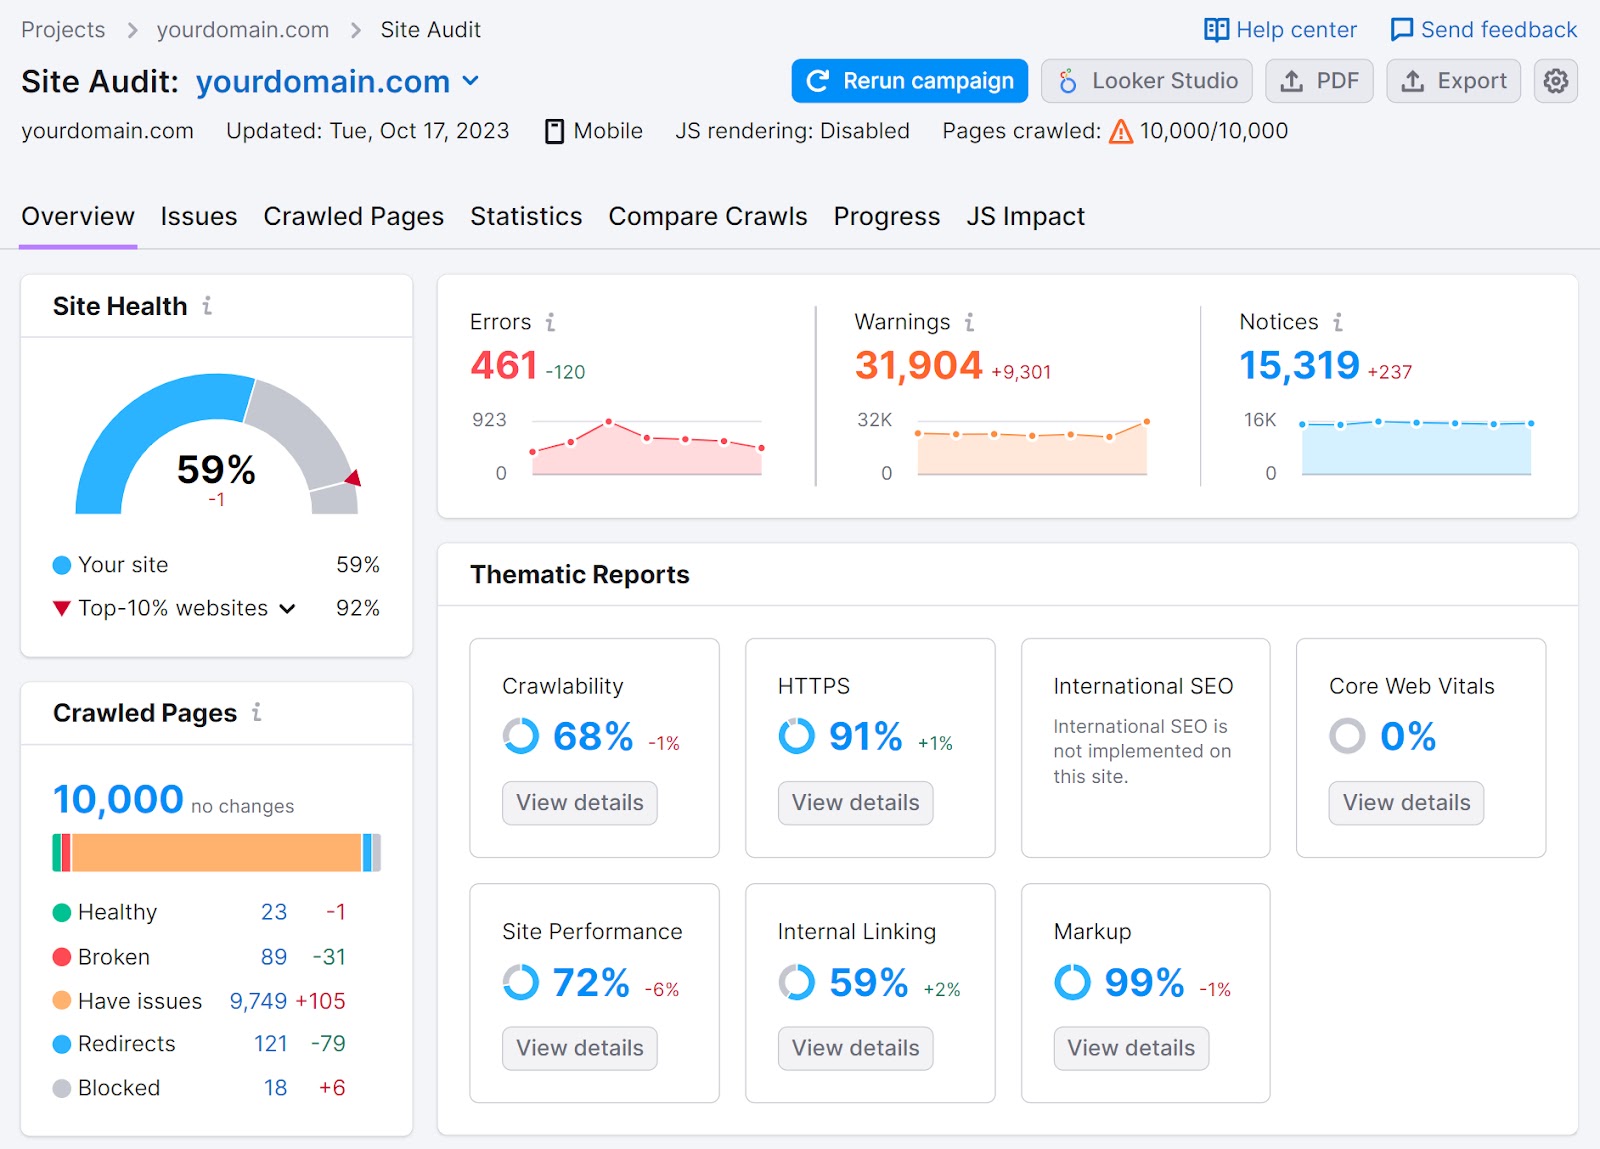
Head to “Crawled Pages” and make sure “Markup” is selected as the heading of column six of the table.
Click “More filters,” choose “Markup” in the left-hand drop-down, and “Open Graph” in the drop-down to its right.
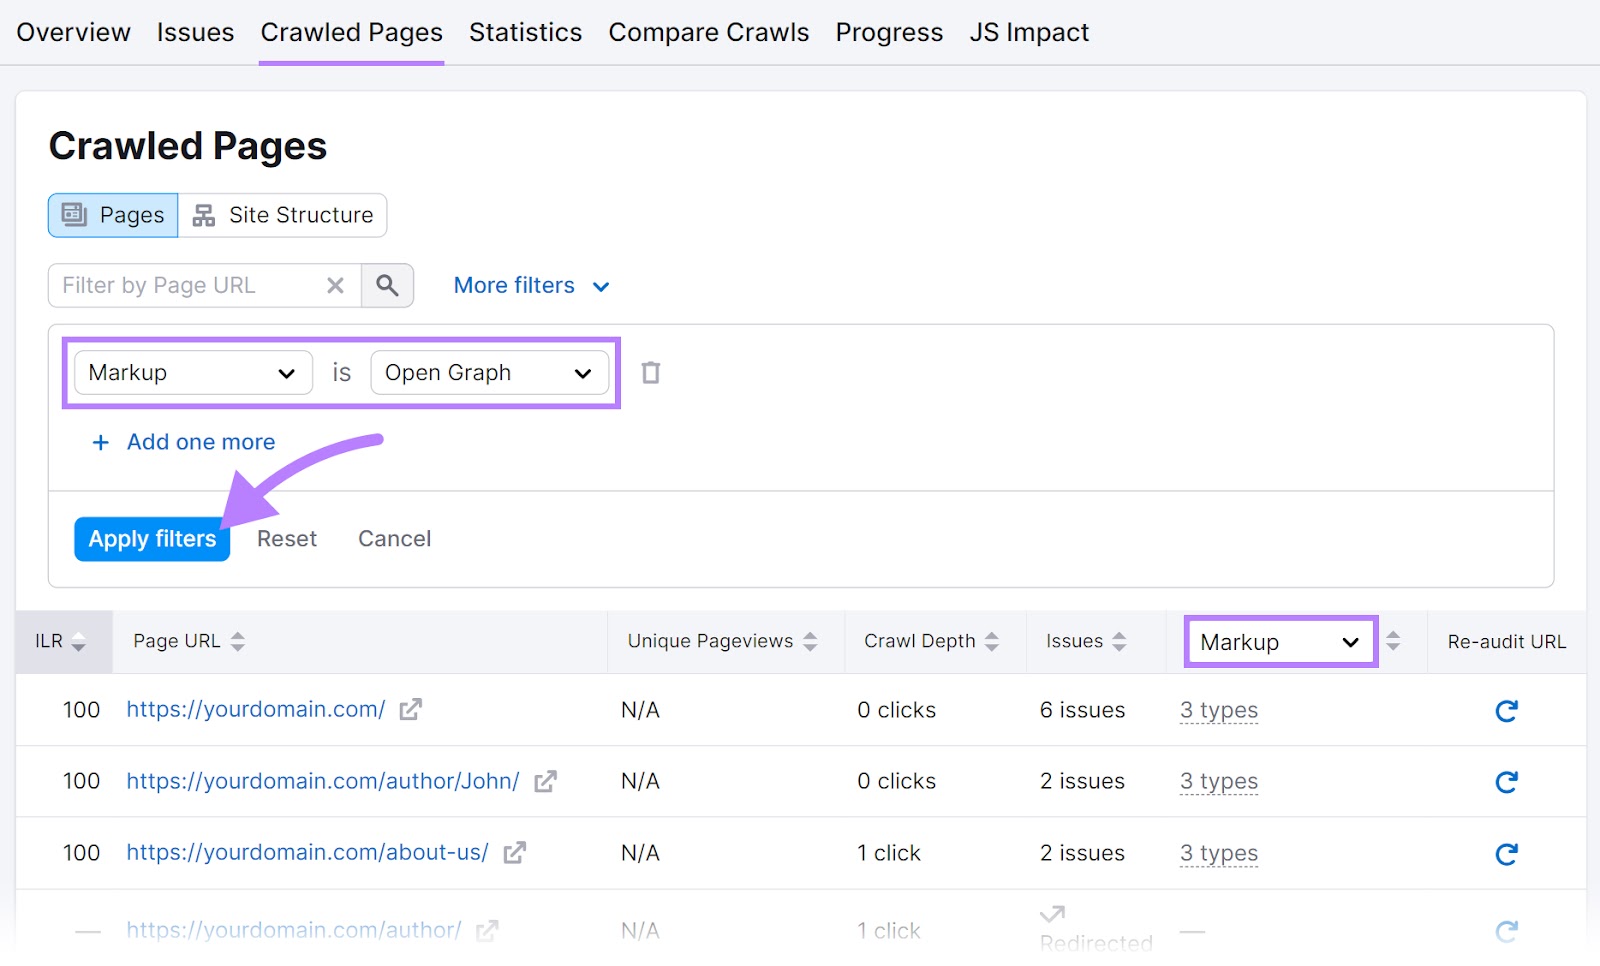
Hit “Apply filters,” and the report will show you all pages on your website with Open Graph meta tags.
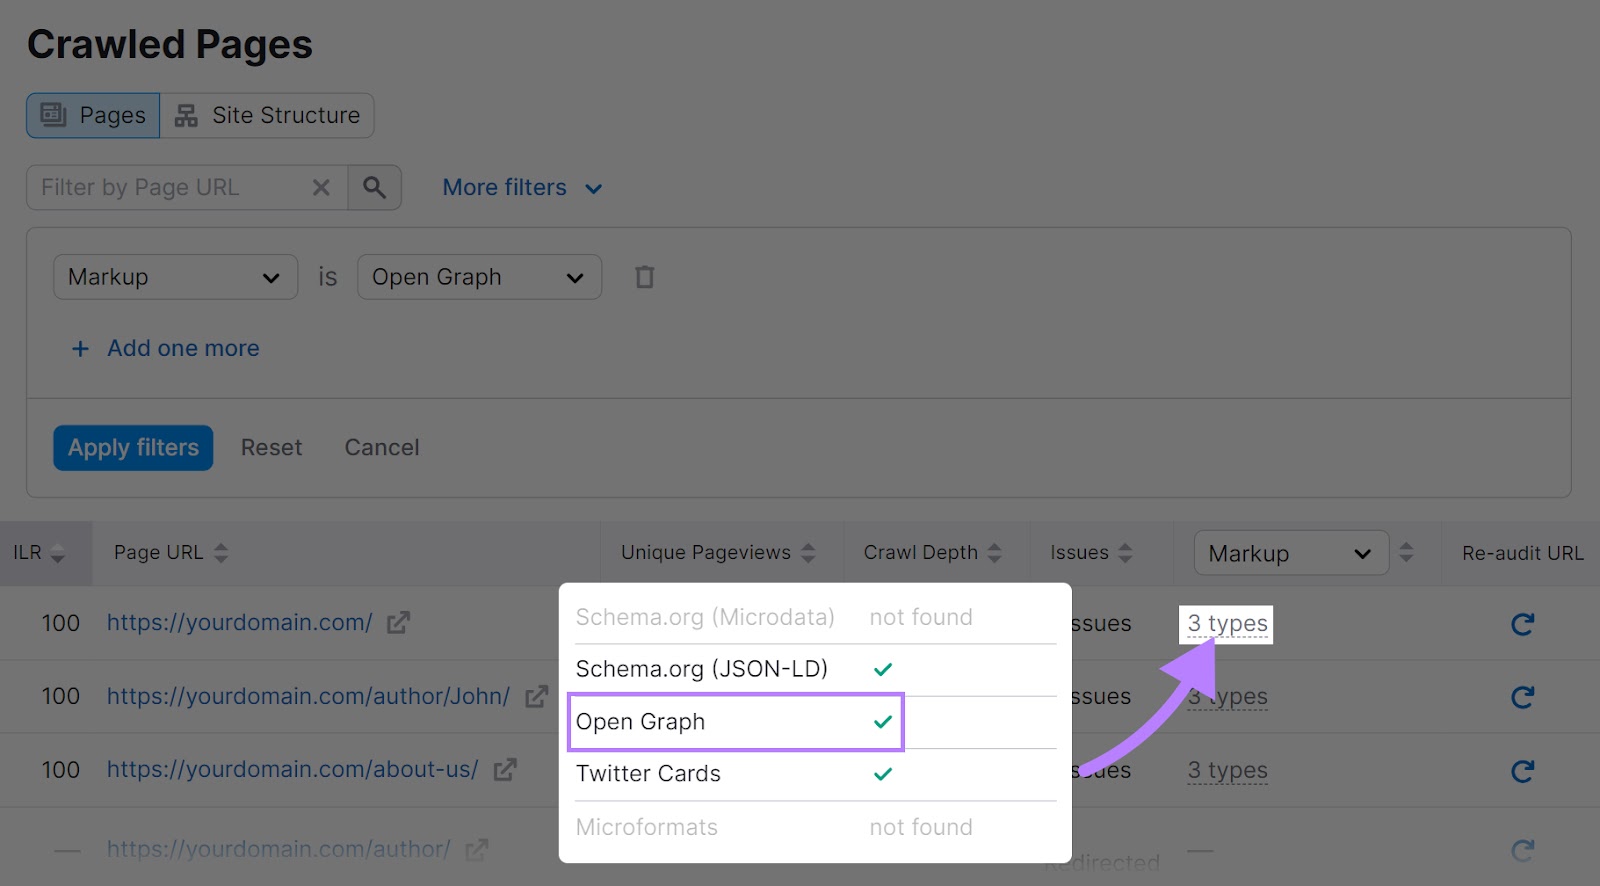
If you click any cell in the “Markup” column, Semrush will also tell whether you’ve correctly implemented Open Graph meta tags via a green check mark.
Now go back to the top of the report and head to “Issues.”
Under “Category,” choose “Meta tags” and check the report: Do any errors, issues, or warnings mention your Open Graph meta tags?
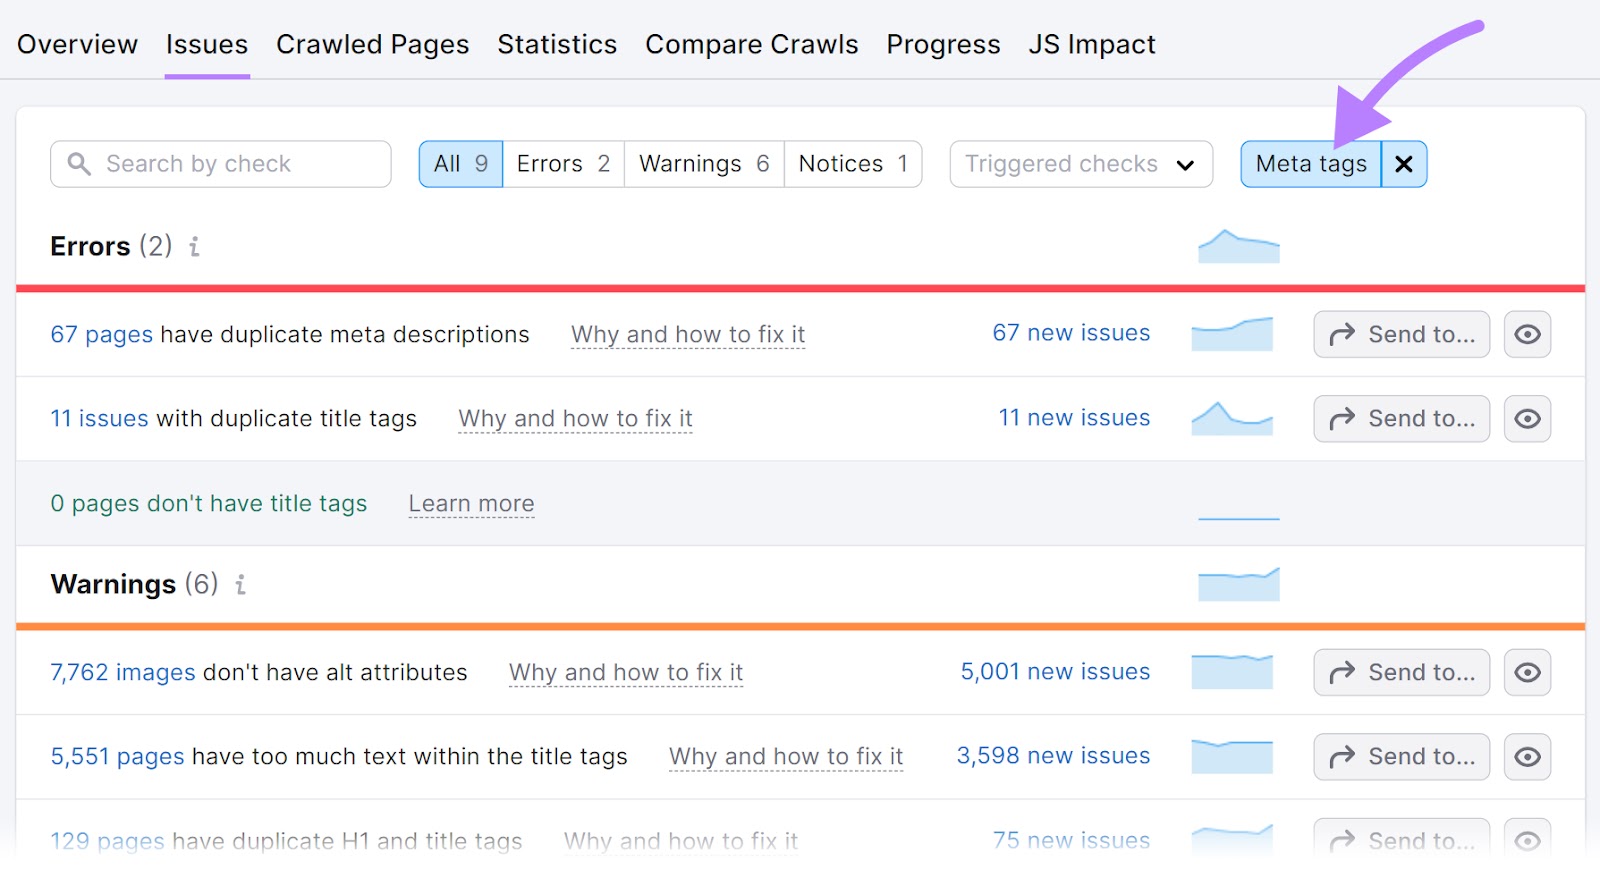
If so, you’ve got something to fix. If not, you’re all set up to shake up your social media audience.
Measuring the Impact of Open Graph on Social Media
We’ve done a lot of work with Open Graph meta tags by now.
How can we find out if they were worth our while?
By looking at key performance indicators (KPIs) of our social media posts, optimized via Open Graph meta tags.
One tool that provides this data is—again—the Facebook Sharing Debugger.
Having provided it with one of our URLs, it tells us how many likes, shares, and comments the post has generated on Facebook.

As with debugging, that’s a valuable piece of information—but inefficiently obtained if you want to gain an overview of the performance of all your Facebook posts.
Social Analytics from Semrush Social can help.
Here’s how:
First, launch the tool and hit “+ Add profile” > “Connect Facebook.”
Follow the instructions in the pop-up to grant Semrush access to your Facebook page. And wait for the account to be successfully connected.

Afterward, click on your page and then on “Posts.”
In the report at the bottom of the page, Semrush will show you all your Open Graph-polished posts alongside their engagement rate, link clicks, shares, comments, and more.
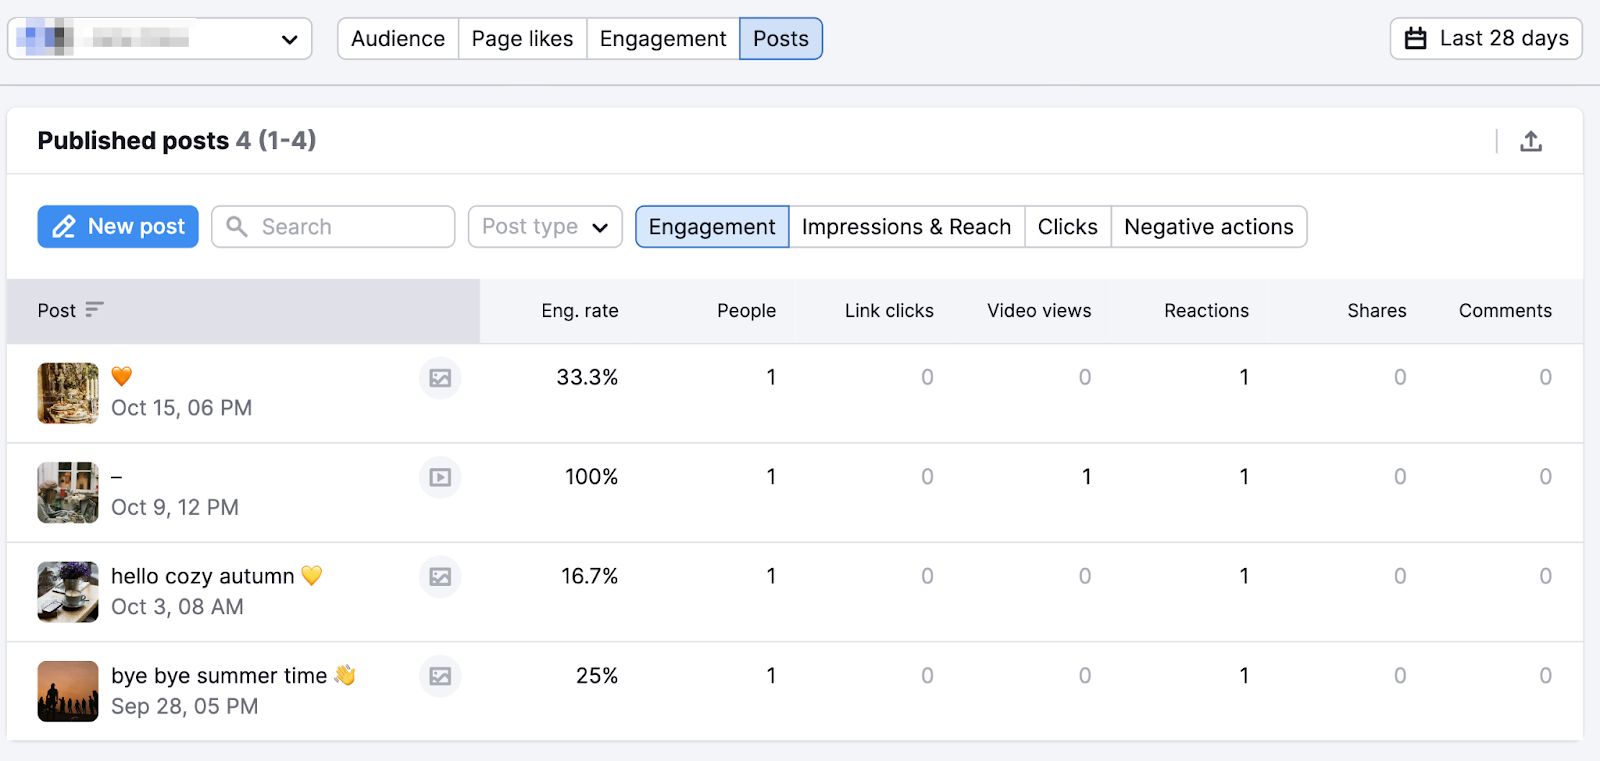
How did your posts tagged with Open Graph perform?
Unleash the Power of Open Graph for Social Media Success
Open Graph meta tags are a powerful tool in your social media arsenal.
They allow you to control how your content is presented on social media platforms, boosting engagement and driving more traffic to your website.
And now that you’ve grasped how to make Open Graph meta tags work for yourself, it’s time to put that knowledge into action.
Want to get an overview of where Open Graph meta tags are—and aren’t—implemented on your website?
Sign up for a Semrush account, run a Site Audit, and check out the report to find out.
