It’s time to talk about Universal Analytics in detail. Since it was released out of beta on April 2 — with a whole bunch of features available in classic Google Analytics — most GA fans have been trying to migrate to Universal Analytics and take advantage of all of its innovations.
Just as with all innovations, these require some time, attention and experimentation to get used to. And while all relevant blogrolls are brimming with content-rich articles on how to implement UA into your projects, what I would need most, personally, is a laconic visualized algorithm of implementation. This could be a starting point for any further research on this new environment.
So let’s start our guide with one of these algorithms and some explanations. An important factor that often makes people worry about migrating to Universal Analytics, with its analytics.js, is event tracking. So, what’s changed?
In Universal Analytics, you can set up event tracking in two ways:
- Via Tag Manager
- Without Tag Manager
Google Tag Manager comes in handy for those who don’t want to mess with a code. And for many items on the site, we don't even need a code at all to collect necessary data because of auto-event tracking in GTM.
So we'll start with the basics and then proceed to how to use GTM.
Tracking Events in Universal Analytics
As you know, event tracking allows you to understand how users interact with your content via clicks, downloads, audio and video play.
The Basics
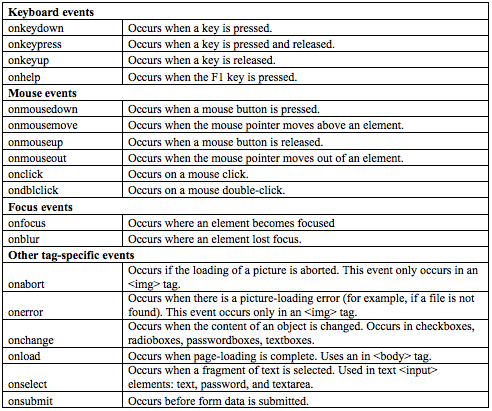
An event is an interaction between user and content. If you have a button on your site or a link to a document download you want to track, you need to set up event tracking. There is a list of HTML events with specific names, and you can choose the event you need by type (mouse click, key click, form submission, etc.). You can view the complete list here:
Each event consists of four components that are designed to categorize things you track:
A category is a primary division of events you can track. You can either name them yourself or choose a regular expression. E.g., if you track several PDF downloads and several button clicks, you should set two categories to view separately in your reports: “pdf” and “button.”
An action is a description of what users do within a selected category. You can either name one yourself or choose a regular expression, depending on how many things you are tracking on your site. Examples: video play, download, link click, external link click, image enlarge.
A label is an optional component you can use if you need to divide events more accurately.
A value is a numerical variable that you can set if you want to track a certain number of actions.
Setting Up Event Tracking in Universal Analytics
To send events to Google Analytics, you must first send a send command to the ga function using an event hit type. This means you must add a piece of code to an element you track, which looks as follows:
- Add the necessary code fragment to any elements on your site you want to track.
If you want to track a PDF download on your site, place a piece of analytics.js code inside a link on your webpage. It will look like this:
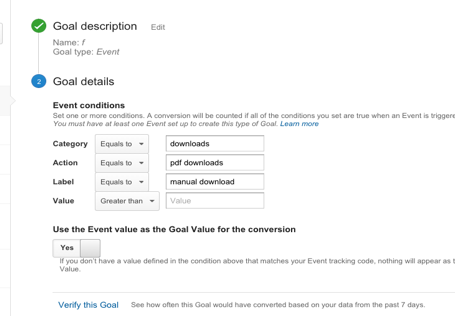
onclick=”ga (‘send’, ‘event’, ‘downloads’, ‘pdf downloads’, ‘manual download’)”
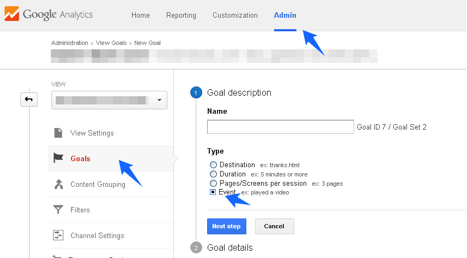
- Go to the Events section in Google Analytics and use the following settings:
Events tracking with Tag Manager
Here it comes — a great opportunity for those who hate coding. Many problems GA users face are related to code and GA scripts. As we can see, accurate tracking requires quite a lot of JavaScript code pieces to be inserted onto each page of a website you want to track. Google Tag Manager allows you to get rid of all this code, replacing it with a single container with all the necessary attributes. Besides, you don’t need to do the coding yourself anymore, as Tag Manager, with its auto-event tracking, can provide you with a necessary piece of code after you set it up.
The Basics
First, here are some terms you will encounter below:
An account is a typical account like those you are used to working with in Google Analytics.
A container is a main fragment of JavaScript code and the only one we are going to place on each page of our site. It contains all tags that you design for your tracking purposes, and a container launches all other tags according to rules you specify.
A tag is a fragment of JavaScript code — for instance, a GA code, a Google AdWords code, another kind of user codes, etc.
A rule is a condition that is necessary to launch or block a tag. For instance, you would use “only links that do not contain yoursite.com” to launch a tag for clicks on external links.
Macros are data with two meanings — name and value we specify to use in tags. Using macros, you can add data concerning a user’s interaction with an element on your site to a Google Analytics tag or any other available tag.
Now let us define the scheme on which all of this is based.
Basically, to "catch" a user’s action, we would need a combination of tags, each with its own rules, pre-designed events, and macros to see it in Google Analytics. For events such as clicks, downloads, form submissions, etc., you would need the following:
- The Event Listener tag that contains the event you want to track and a rule according to which the tag will fire (activate)
- The Google Analytics tag used to pass information to Google Analytics when the Event Listener tag fires
Let's take the previous example and track our PDF manual download.
- To use Tag Manager, just go here: http://www.google.com/tagmanager/ and log in/create an account
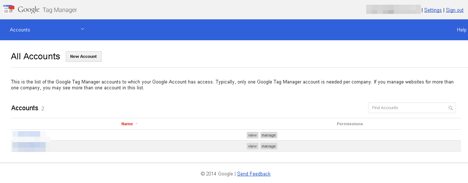
- Create a new account and name it
- Create a container and name it. If you want, list domains you want to be present in this container
- Create an Event Listener tag, and choose Link Click Listener, as you will specify a certain URL of the document
- In our case, we will 'listen' to all pages of the site; however, this case is specific, and if you have PDFs on certain pages, then you can specify them. So, here we create a rule to track all pages of our site:
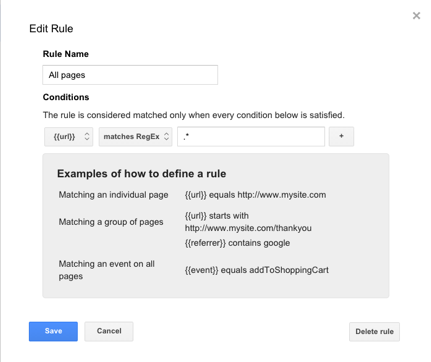
Then, we create a Here comes a Google Analytics tag to collect data about downloads. Here is where we specify all the details. Edit a rule to specify your document.
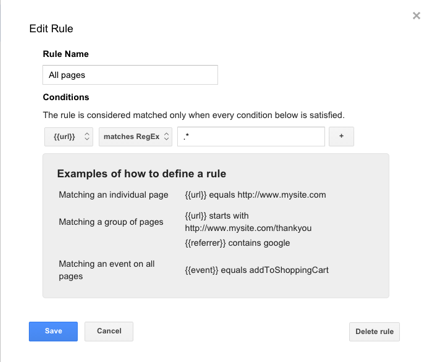
Note: Here we can see an event called gtm.linkClick. For various purposes we can use various values, such as:
gtm.click
gtm.linkClick
gtm.formSubmit
And so on.
We can also see a condition for the URL we are tracking. You can specify URLs containing manual.pdf by means of a regular expression.
Tracking Ecommerce Transactions via Google Tag Manager
Tracking ecommerce with Universal Analytics is quite a difficult thing to do. Implementing ecommerce tracking both via Google Tag Manager and UA code requires even more code on our purchase success page, while the idea of Google Tag Manager is getting rid of extra code on our pages. So, if you want to use Google Tag Manager to track ecommerce transactions, you do not need to have the ecommerce tracking code on your site.
As for ecommerce, the algorithm is quite simple; however, its details will depend on the structure of the online store and on which pages the GTM container is located. This can be located on a final “Thank you” page in your sales funnel, a button, or on other types of stuff. Let’s consider a “Thank you” page as an example. It is crucial to use a data layer in order to track everything properly in GTM.
To create a general algorithm:
- Add the required ecommerce transaction information via the data layer above the Google Tag Manager Container so the latter can operate with this data and pass it to Google Analytics
- Create a Google Analytics GTM tag with a transaction
- Set rules to fire
- Check your ecommerce settings in Google Analytics
- Have fun with your reports!
First off, to view purchase data in Google Tag Manager, use a data layer and a specific order of data transmission according to GTM Data Layer instructions: support.google.com/tagmanager/answer/3002596.
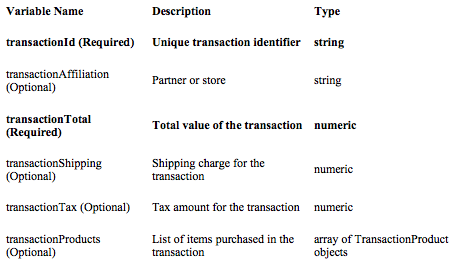
A bit of advice: use optional parameters as well as required ones. Doing so can be of great use in your further reports when segmenting and analyzing your sales.
Then, the data layer elements need to be initialized on the page, so you should place the following code snippet in the head section or anywhere above the GTM container code:
<script type="text/javascript">
var dataLayer = [];
</script>
The GTM container code is an empty object you can fill with necessary information you need to be passed to GTM to indicate the page, such as data variables, subcategories, product types, etc. Doing this is optional, so you can leave the object empty.
A ready-made piece of data layer for a code you place on a Thank You page might look like this:
<script>
dataLayer = [{
'transactionId': '9800',
'transactionTotal': 450,
'transactionTax': 15,
'transactionShipping': 35,
'transactionProducts': [{
'sku': 'MB111',
'name': 'KS-65',
'category': 'MIDI-keyboard',
'price': 350,
'quantity': 1
},{
'sku': 'FP7589',
'name': 'SP-1',
'category': 'Sustain pedal',
'price': 50,
'quantity': 1
}]
}];
</script>
And again, this piece of code must be inserted before the Google Tag Manager Container.
Next, proceed to Google Tag Manager, create a Google Analytics tag (Universal Analytics or classic Google Analytics, depending on the code you are using), and choose a Transaction Track type:
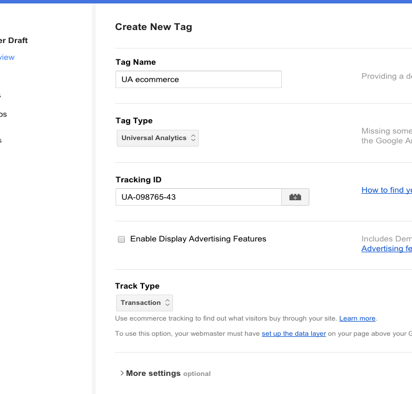
Create a URL-dependent rule for this tag for GTM to fire on your thankyou.html page:
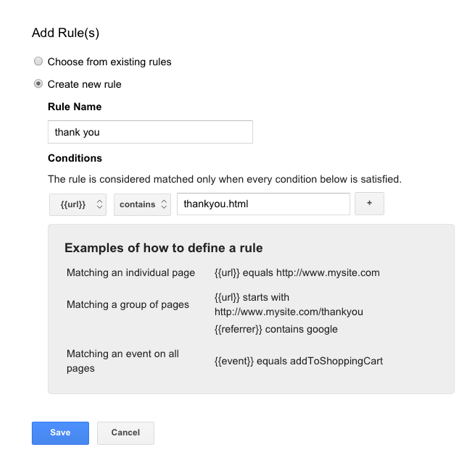
This example illustrates the simplest cases. If you want this GTM tag to fire according to custom events, you can push the data inside the data layer, combining data layer and event push methods described in developers.google.com/tag-manager/devguide#multipush.
As you can see, it all looks pretty easy. But it's really not when it comes to complex macros and detailed tracking. Google Tag Manager covers all aspects of website tracking; and we are constantly rediscovering its rich functionality, since we realize GTM is the future of web analytics.
If you want to make money from your online store, you must track as much information as possible regarding your users, pages, clicks and views. Keeping pace with constantly evolving tools, such as the revolutionary Google Tag Manager, can save you time, money, and long hours of hard coding, providing not only in-depth vision of activities users take on your site, but also high operation speed and flexibility.
