When you were younger you probably had to clean your room from time to time. As you spent time there laundry would pile up, dust would build up and your mom may have tried to help you be proactive in cleaning it so she didn’t have to help you when things go really bad.
Google Analytics is similar in that you have little chores you need to do the keep the Google Analytics data clean and organized properly so that the numbers you analyze are as good as they can be. Nothing can ever be absolutely perfect (yes, even with data!), but embrace these tips and you’ll have a killer dataset at your disposal.
Remove internal IP addresses
If you, your team or any others that are not customers or potential customers have good reason to visit your website(for example, to make content updates or sales support), then it’s important to filter out the IP addresses of those people. If you do not, then your data could be full of your internal sales simply visiting your website for reasons you do not want to be lumped in with your data from consumers visiting your website.
However, you shouldn’t filter out these people entirely. Best practice is actually to separate internal and external traffic. Profiles that include internal traffic can be used to test changes or QA updates, while external traffic profiles should be reserved for reporting.

How to solve the problem
Step #1
First, find out your public IP address. Google search “my ip” and copy the value that will appear (trust us, you can’t miss it!).
Step #2
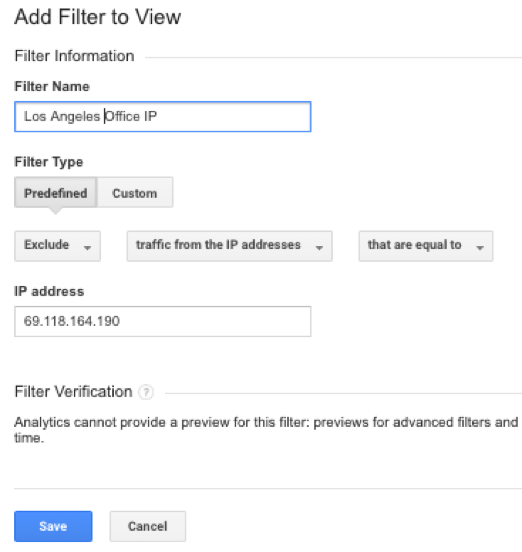
Navigate to Google Analytics and create a profile filter in your External profile (what you see when you first login), as shown below.

Step #3
Select Predefined > Exclude > traffic by IP address > equal to. Then paste the IP address value in and click “Save.”
Step #4
Repeat this process as IP addresses change or new team members or non-customer audiences are added.
The screenshot below shows what you will see and what selections you need to make to create this new filter:
Customize your channel groupings
Arguably the most popular Google Analytics report is the Channels report that shows the traffic breakdown by Channels like Organic Search, Paid Search, Direct, Referral and Social, etc.; however, there are times where Google Analytics may not apply the correct Channel to your sources.
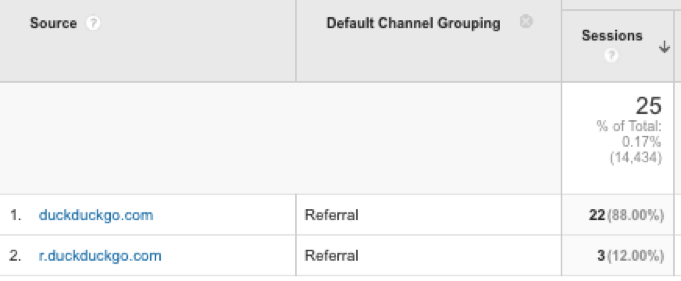
In the screenshot below, you will see that duckduckgo.com, a search engine that does not track you, comes through as a Referral when it should be Organic Search:
How to solve the problem
Step #1
Navigate to the Admin > Channel Settings on the right-hand side.
Step #2
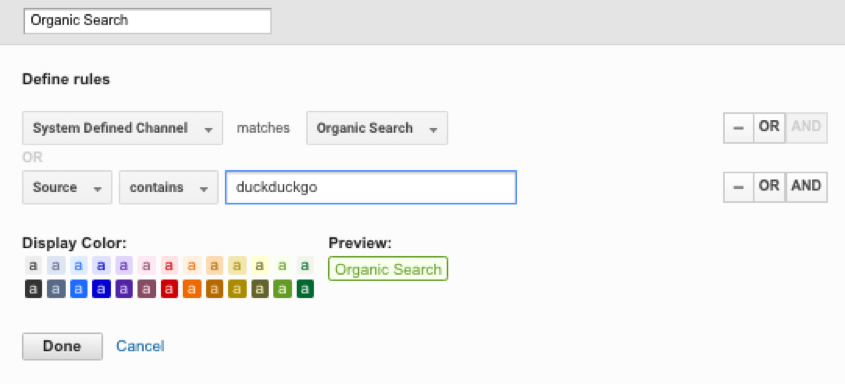
Select Default channel grouping > Organic search.
Step #3
Select “OR” and add Source containing “duckduckgo,” as shown in the screenshot below.
Step #4
Repeat this process if Google classifies social sources as referrals or manually tracked campaigns, such as an email marketing campaign, as “(Other)”
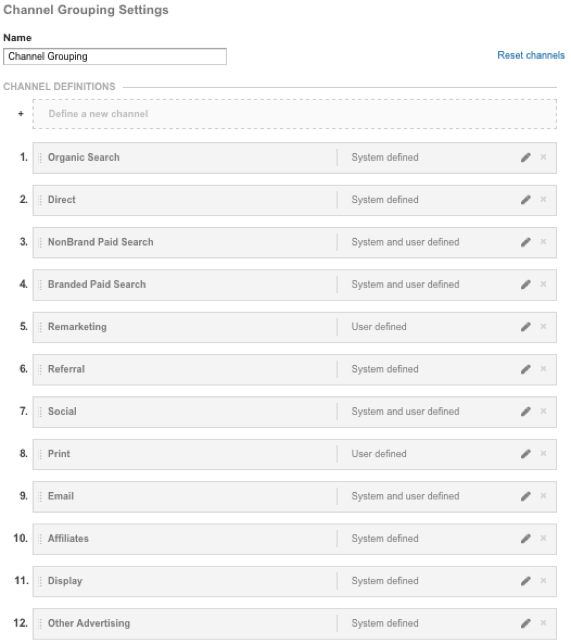
You can even take this a step further to create additional Channel groupings like breaking out Branded PPC and Non Brand PPC, Affiliate, Remarketing, and even Print ads. The screenshot below shows what that might look like if you created several different Channel groupings:
Remove parameters in URL
Let’s say that you have dynamic URLs on your site that populate based on filters or promo codes entered, like the red shoes URL example below:
www.mywebsite.com /red-shoes.jsp?aNum=12345&prodKeyCode=3TRB01
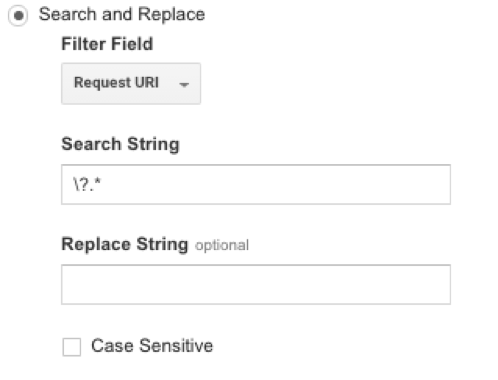
This causes Google Analytics to track separate pageviews for each dynamic URL for red shoes URLs, which makes reporting difficult. The best way to combat this is to add a search and replace filter to remove the URLs parameters (which is everything after the ? in the URL). This way the pageview data will all be grouped under “/red-shoes.jsp” in Google Analytics making page metrics a lot cleaner to report on.
How to solve the problem
Step #1
Navigate to Admin > Filters on the right-hand side.
Step #2
Create a New filter and select “Search and Replace.”
Step #3
Select “Request URL” as the filter field and paste “\?.*” into the Search String field while leaving the Replace String blank. This will remove all “?” in all URLs and any characters that follow.
Below shows an example:
Create content groups
If your website has lots of different types of pages—for example, if you are a news site and you have content about sports, politics, science, finance, movies, shopping, and business, etc.—you can use content groups to easily view the session and page metrics as it pertains to those pages.
There are three ways to create content groups, but the easiest is through rule definitions. Note that this method requires that there be something unique in the URL or Page Title for the different types of content you want in your group.
How to solve the problem
Step #1
Navigate to Admin > Content Grouping > New
Step #2
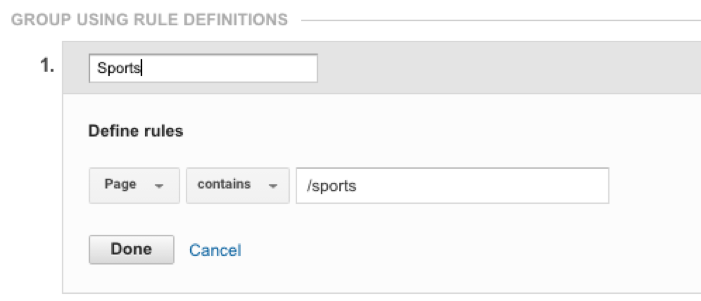
After naming the group, select “create a rule set” and define your first rule. Below shows the example for a “Sports” page.
Step #3
Repeat for the remaining content types in your group and click Save.
Excluding bots and spam
Navigate to your Admin Panel > View Settings. At the bottom of the screen ensure that the checkbox below is checked and repeat this process across every profile you have.
You want as many precautions as you can have when it comes to filtering for bots, so this is always going to be your first line of defense:

While this is a great first step, there are still several bots not picked up which is where the next three steps come into play.
How to solve the problem
Step #1
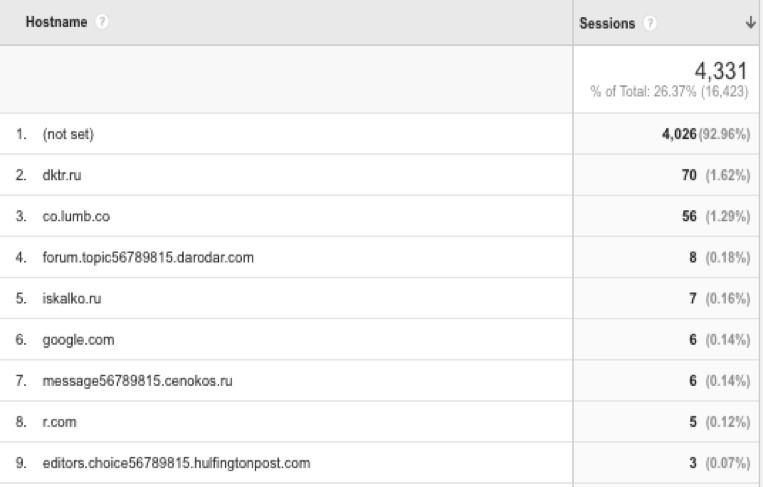
Create a custom report with the following criteria: Metric = sessions and Dimension = hostname. If the data returns sessions for hostnames that aren’t yours, then that means that bots or other websites are accessing your tracking code and imitating sessions to your site.
In the example below, you can see that all of these hostnames are not our actual domain, which means they are mimicking sessions to my website and therefore skewing the data.
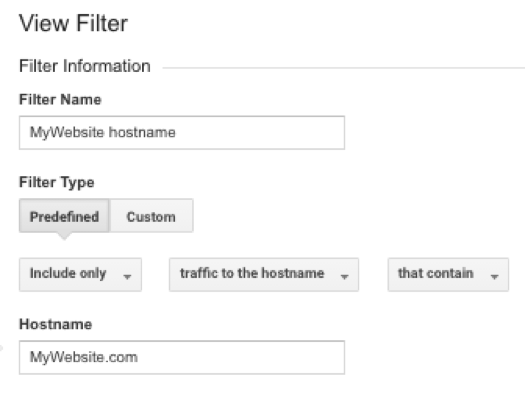
The best way to combat this is with a hostname filter. You can find this by going to Admin > Select Filters > Click “Add New.” Then select the criteria as it looks below.
Step #2
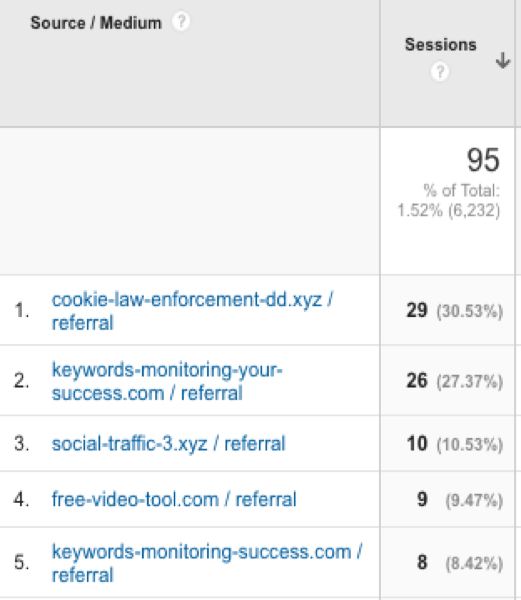
Review your referral sources under Acquisition > All Traffic > Referrals.
You should be able to tell a spam or bot referral source from one that isn’t (see examples of bots below), however, if you have a lot of referral sources a good trick would be to sort your referrals by bounce rate. More often than not, spam or bots will have a 100% bounce rate or close to it.
The final takeaway
While these 5 tips might seem like a lot of steps, this type of cleanup can really pay dividends as your business or website grows. Get setup early to give you and your team the most actionable dataset you can. Happy analyzing!
Questions or comments? Let us know your thoughts in the comment section below.
